 |
You’re reading Ry’s Git Tutorial |
Branches, Part I
Branches are the final component of Git version control. This gives us four core elements to work with throughout the rest of this tutorial:
- The Working Directory
- The Staged Snapshot
- Committed Snapshots
- Development Branches
In Git, a branch is an independent line of development. For example, if you wanted to experiment with a new idea without using Git, you might copy all of your project files into another directory and start making your changes. If you liked the result, you could copy the affected files back into the original project. Otherwise, you would simply delete the entire experiment and forget about it.
This is the exact functionality offered by Git branches—with some key improvements. First, branches present an error-proof method for incorporating changes from an experiment. Second, they let you store all of your experiments in a single directory, which makes it much easier to keep track of them and to share them with others. Branches also lend themselves to several standardized workflows for both individual and collaborative development, which will be explored in the latter half of the tutorial.

If you’ve been following along from the previous module, you already have everything you need. Otherwise, download the zipped Git repository from the above link, uncompress it, and you’re good to go.
View Existing Branches
Let’s start our exploration by listing the existing branches for our project.
gitbranch
This will display our one and only branch: * master. The
master branch is Git’s default branch, and the asterisk next
to it tells us that it’s currently checked out. This means that the most
recent snapshot in the master branch resides in the working
directory:
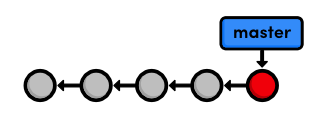
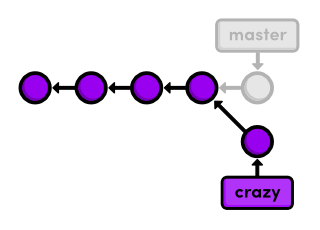
master branchNotice that since there’s only one working directory for each project, only one branch can be checked out at a time.
Checkout the Crazy Experiment
The previous module left out some details about how checking out previous commits actually works. We’re now ready to tackle this topic in depth. First, we need the checksums of our committed snapshots.
gitlog--oneline
This outputs the following history.
506bb9bRevert "Add a crazzzy experiment"514fbe7Add a crazzzy experiment1c310d2Add navigation links54650a3Create blue and orange pagesb650e4bCreate index page
Check out the crazy experiment from the last module, remembering to change
514fbe7 to the ID of your fourth commit.
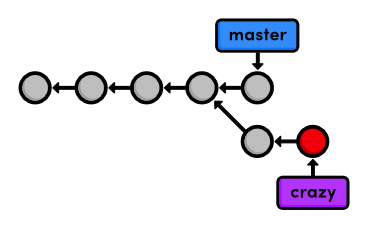
gitcheckout514fbe7
This command returns a message that says we’re in a detached
HEAD state and that the HEAD is now at
514fbe7. The HEAD is Git’s internal way of
indicating the snapshot that is currently checked out. This means the red
circle in each of our history diagrams actually represents Git’s
HEAD. The following figure shows the state of our repository
before and after we checked out an old commit.
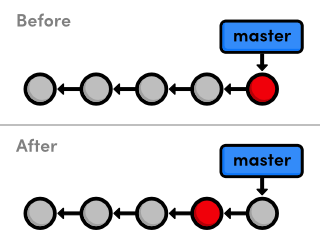
As shown in the “before” diagram, the HEAD normally
resides on the tip of a development branch. But when we checked out the
previous commit, the HEAD moved to the middle of the branch. We
can no longer say we’re on the master branch since it
contains more recent snapshots than the HEAD. This is reflected in
the git branch output, which tells us that we’re currently
on (no branch).
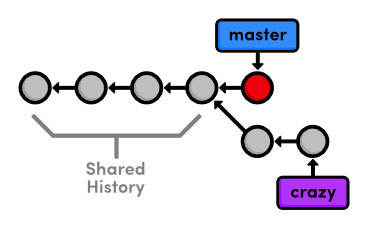
Create a New Branch
We can’t add new commits when we’re not on a branch, so let’s create one now. This will take our current working directory and fork it into a new branch.
gitbranchcrazy
Note that git branch is a versatile command that can be used to
either list branches or create them. However, the above command only
creates the crazy branch—it doesn’t check it
out.
gitcheckoutcrazy
We’re now free to experiment in the working directory without
disturbing anything in the master branch. The crazy
branch is a completely isolated development environment that can be
visualized as the following.
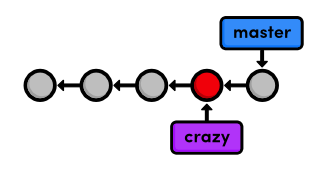
Right now, the crazy branch, HEAD, and working
directory are the exact same as the fourth commit. But as soon as we add
another snapshot, we’ll see a fork in our project history.
Make a Rainbow
We’ll continue developing our crazy experiment by changing
crazy.html to the following.
<!DOCTYPE html><htmllang="en"><head><title>A Crazy Experiment</title><metacharset="utf-8"/></head><body><h1>A Crazy Experiment</h1><p>Look! A Rainbow!</p><ul><listyle="color: red">Red</li><listyle="color: orange">Orange</li><listyle="color: yellow">Yellow</li><listyle="color: green">Green</li><listyle="color: blue">Blue</li><listyle="color: indigo">Indigo</li><listyle="color: violet">Violet</li></ul><p><ahref="index.html">Return to home page</a></p></body></html>
Stage and Commit the Rainbow
Hopefully, you’re relatively familiar with staging and committing snapshots by now:
gitaddcrazy.htmlgitstatusgitcommit-m"Add a rainbow to crazy.html"
After committing on the crazy branch, we can see two
independent lines of development in our project:
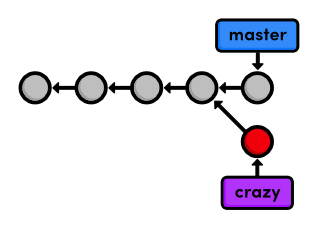
Also notice that the HEAD (designated by the red circle)
automatically moved forward to the new commit, which is intuitively what we
would expect when developing a project.
The above diagram represents the complete state of our repository, but
git log only displays the history of the current branch:
677e0e0Add a rainbow to crazy.html514fbe7Add a crazzzy experiment*1c310d2Add navigation links*54650a3Create blue and orange pages*b650e4bCreate index page
Note that the history before the fork is considered part of the new
branch (marked with asterisks above). That is to say, the crazy
history spans all the way back to the first commit:
crazy branchThe project as a whole now has a complex history; however, each individual branch still has a linear history (snapshots occur one after another). This means that we can interact with branches in the exact same way as we learned in the first two modules.
Rename the Rainbow
Let’s add one more snapshot to the crazy branch. Rename
crazy.html to rainbow.html, then use the following
Git commands to update the repository.
gitstatusgitrmcrazy.htmlgitstatusgitaddrainbow.htmlgitstatus
The git rm command tells Git to stop tracking
crazy.html (and delete it if necessary), and git add
starts tracking rainbow.html. The renamed: crazy.html ->
rainbow.html message in the final status output shows us that Git is
smart enough to figure out when we’re renaming a file.
Our snapshot is staged and ready to be committed:
gitcommit-m"Rename crazy.html to rainbow.html"gitlog--oneline
After this addition, our complete repository history looks like the
following. Remember that the crazy branch doesn’t include
any commits in master after the fork.
Return to the Master Branch
Let’s switch back to the master branch:
gitcheckoutmastergitbranchgitlog--oneline
After the checkout, crazy.html doesn’t exist in the
working directory, and the commits from the last few steps don’t appear
in the history. These two branches became completely independent
development environments after they forked. You can think of them as separate
project folders that you switch between with git checkout. They
do, however, share their first four commits.
Create a CSS Branch
We’re going to put our crazy experiment on the backburner for now and turn our attention to formatting the HTML pages with a cascading stylesheet (CSS). Again, if you’re not all that comfortable with HTML and CSS, the content of the upcoming files isn’t nearly as important as the Git commands used to manage them.
Let’s create and check out a new branch called css.
gitbranchcssgitcheckoutcss
The new branch points to the currently checked out snapshot, which happens to
coincide with the master branch:
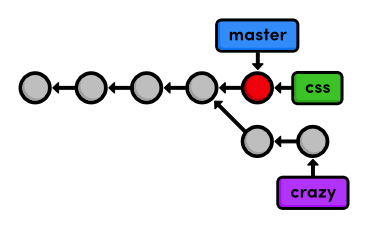
css branchAdd a CSS Stylesheet
Next, create a file called style.css with the following
content. This CSS is used to apply formatting to the HTML in our other
files.
body{padding:20px;font-family:Verdana,Arial,Helvetica,sans-serif;font-size:14px;color:#111;}p,ul{margin-bottom:10px;}ul{margin-left:20px;}
Commit the stylesheet in the usual fashion.
gitaddstyle.cssgitstatusgitcommit-m"Add CSS stylesheet"
Link the Stylesheet
We still need to tell the HTML pages to use the formatting in
style.css. Add the following text on a separate line after the
<title> element in index.html,
blue.html, and orange.html (remember that
rainbow.html only exists in the crazy branch). You
should be able to see the CSS formatting by opening index.html in
a web browser.
<linkrel="stylesheet"href="style.css"/>
Commit the changes.
gitaddindex.htmlblue.htmlorange.htmlgitstatusgitcommit-m"Link HTML pages to stylesheet"gitlog--oneline
This results in a repository history that looks like:
Return to the Master Branch (Again)
The css branch let us create and test our formatting without
threatening the stability of the master branch. But, now we need
to merge these changes into the main project. Before we attempt the merge, we
need to return to the master branch.
gitcheckoutmaster
Verify that style.css doesn’t exist and that HTML pages
aren’t linked to it. Our repository history remains unchanged, but the
working directory now matches the snapshot pointed to by the
master branch.
Take a look at the git log --oneline output as well.
af23ff4Revert "Add a crazzzy experiment"a50819fAdd a crazzzy experiment4cd95d9Add navigation linksdcb9e07Create blue and orange pagesf757eb3Create index page
As expected, there is no mention of the CSS additions in the history of
master, but we’re about to change that.
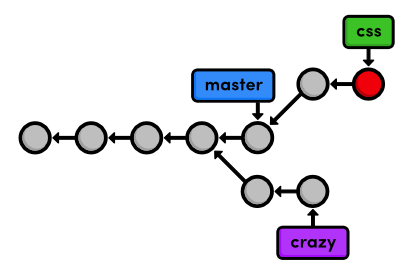
Merge the CSS Branch
Use the git merge command to take the snapshots from the
css branch and add them to the master branch.
gitmergecss
Notice that this command always merges into the current branch:
css remains unchanged. Check the history to make sure that the
css history has been added to master.
gitlog--oneline
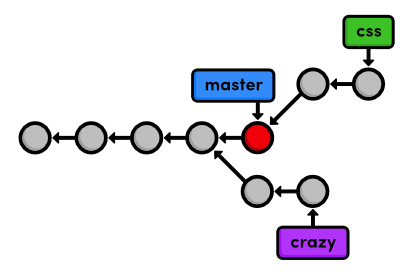
The following diagram visualizes the merge.
css branch into
masterInstead of re-creating the commits in css and adding them to
the history of master, Git reuses the existing snapshots and
simply moves the tip of master to match the tip of
css. This kind of merge is called a fast-forward
merge, since Git is “fast-forwarding” through the new
commits in the css branch.
After the merge, both branches have the exact same history, which makes them
redundant. Unless we wanted to keep developing on the css branch,
we’re free to get rid of it.
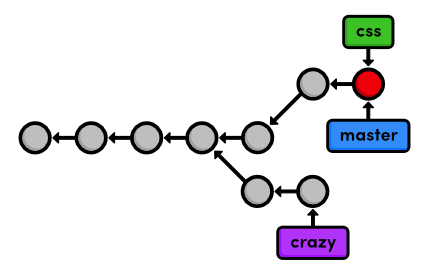
Delete the CSS Branch
We can safely delete a branch by passing the -d flag to
git branch.
gitbranch-dcssgitbranch
Since css and master represent the same branch,
our history looks the same, though the css branch has been
removed. I’ve also put the master branch’s commits in
a straight line in the following visualization, making it easier to track
during the upcoming modules.
css branchDeleting branches is a relatively “safe” operation in the sense that Git will warn you if you’re deleting an unmerged branch. This is just another example of Git’s commitment to never losing your work.
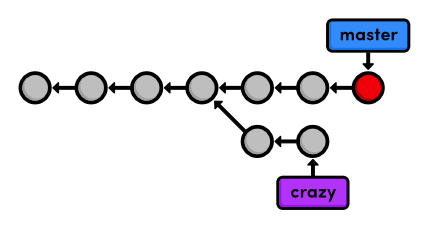
Conclusion
This module used two branches to experiment with new additions. In both
cases, branches gave us an environment that was completely isolated from the
“stable” version of our website (the master branch).
One of our experiments is waiting for us in the next module, while our CSS
changes have been merged into the stable project, and its branch is thus
obsolete. Using branches to develop small features like these is one of the
hallmarks of Git-based software management.
While this module relied heavily on branch diagrams to show the complete state of the repository, you don’t need to keep this high-level overview in mind during your everyday development. Creating a new branch is really just a way to request an independent working directory, staging snapshot, and history. You can think of branches as a way to multiply the functionality presented in the first two module.
Next, we’ll practice our branch management skills by examining the typical workflow of veteran Git users. We’ll also discover more complicated merges than the fast-forward merge introduced above.
Quick Reference
git branch- List all branches.
git branch <branch-name>- Create a new branch using the current working directory as its base.
git checkout <branch-name>- Make the working directory and the
HEADmatch the specified branch. git merge <branch-name>- Merge a branch into the checked-out branch.
git branch -d <branch-name>- Delete a branch.
git rm <file>- Remove a file from the working directory (if applicable) and stop tracking the file.