 |
You’re reading Ry’s Git Tutorial |
Branches, Part II
Now that we’ve covered the mechanics behind Git branches, we can discuss the practical impact that they have on the software development process. Instead of introducing new commands, this module covers how the typical Git user applies this workflow to real projects, as well as some of the problems that arise in a branched environment.
To Git, a branch is a branch, but it’s often useful to assign special
meaning to different branches. For example, we’ve been using
master as the stable branch for our example project, and
we’ve also used a temporary branch to add some CSS formatting. Temporary
branches like the latter are called topic branches because
they exist to develop a certain topic, then they are deleted. We’ll work
with two types of topic branches later in this module.
Amid our exploration of Git branches, we’ll also discover that some merges cannot be “fast-forwarded.” When the history of two branches diverges, a dedicated commit is required to combine the branches. This situation may also give rise to a merge conflict, which must be manually resolved before anything can be committed to the repository.

If you’ve been following along from the previous module, you already have everything you need. Otherwise, download the zipped Git repository from the above link, uncompress it, and you’re good to go.
Continue the Crazy Experiment
Let’s start by checking out the crazy branch.
gitbranchgitcheckoutcrazygitlog--oneline
The crazy branch is a longer-running type of topic branch
called a feature branch. This is fitting, as it was created
with the intention of developing a specific feature. It’s also a
term that makes Git’s contribution to the development workflow readily
apparent: branches enable you to focus on developing one clearly defined
feature at a time.
This brings us to my rule-of-thumb for using Git branches:
- Create a new branch for each major addition to your project.
- Don’t create a branch if you can’t give it a specific name.
Following these simple guidelines will have a dramatic impact on your programming efficiency.
Merge the CSS Updates
Note that the CSS formatting we merged into master is nowhere
to be found. This presents a bit of a problem if we want our experiment to
reflect these updates. Conveniently, Git lets us merge changes into
any branch (not just the master branch). So, we can pull
the updates in with the familiar git merge command. Remember that
merging only affects the checked-out branch.
gitmergemastergitlog--oneline
As of Git 1.7.10, this will open your editor and prompt you for a message
explaining why the commit was necessary. You can use the default Merge
branch 'master' into crazy. When you save and close the file,
you’ll notice an extra commit in your project history. Recall that our
first merge didn’t add any new commits; it just
“fast-forwarded” the tip of the master branch. This
was not the case for our new merge, which is shown below.
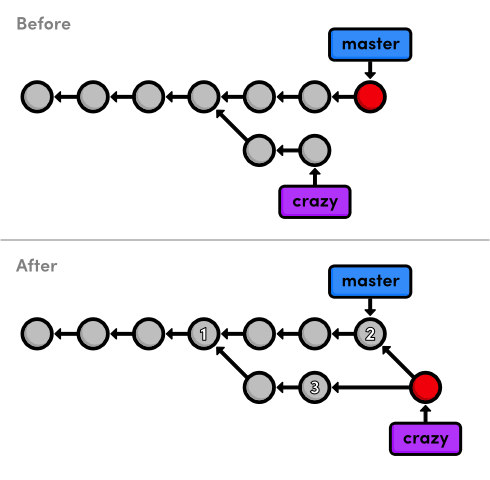
master into the crazy branchTake a moment to examine why the current merge couldn’t be a
fast-forward one. How could Git have walked the crazy pointer
over to the tip of the master branch? It’s not possible
without backtracking, which kind of defeats the idea of
“fast-forwarding.” We’re left with a new way to combine
branches: the 3-way merge.
A 3-way merge occurs when you try to merge two branches whose history has
diverged. It creates an extra merge commit to function as a
link between the two branches. As a result, it has two parent commits.
The above figure visualizes this with two arrows originating from the tip of
crazy. It’s like saying “this commit comes from both
the crazy branch and from master.”
After the merge, the crazy branch has access to both its history
and the master history.
The name comes from the internal method used to create the merge commit. Git looks at three commits (numbered in the above figure) to generate the final state of the merge.
This kind of branch interaction is a big part of what makes Git such a powerful development tool. We can not only create independent lines of development, but we can also share information between them by tying together their histories with a 3-way merge.
Style the Rainbow Page
Now that we have access to the CSS updates from master, we can
continue developing our crazy experiment. Link the CSS stylesheet to
rainbow.html by adding the following HTML on the line after the
<title> element.
<linkrel="stylesheet"href="style.css"/>
Stage and commit the update, then check that it’s reflected in the history.
gitstatusgitcommit-a-m"Add CSS stylesheet to rainbow.html"gitlog--oneline
Notice that we skipped the staging step this time around. Instead of using
git add, we passed the -a flag to git
commit. This convenient parameter tells Git to automatically include
all tracked files in the staged snapshot. Combined with the
-m flag, we can stage and commit snapshots with a single command.
However, be careful not to include unintended files when using the
-a flag.
Link to the Rainbow Page
We still need to add a navigation link to the home page. Change the
“Navigation” section of index.html to the
following.
<h2>Navigation</h2><ul><listyle="color: #F90"><ahref="orange.html">The Orange Page</a></li><listyle="color: #00F"><ahref="blue.html">The Blue Page</a></li><li><ahref="rainbow.html">The Rainbow Page</a></li></ul>
As usual, stage and commit the snapshot.
gitcommit-a-m"Link index.html to rainbow.html"gitlog--oneline
Fork an Alternative Rainbow
Next, we’re going to brainstorm an alternative to the current
rainbow.html page. This is a perfect time to create another topic
branch:
gitbranchcrazy-altgitcheckoutcrazy-alt
Remember, we can do whatever we want here without worrying about either
crazy or master. When git branch creates
a branch, it uses the current HEAD as the starting point for the
new branch. This means that we begin with the same files as crazy
(if we called git branch from master, we would have
had to re-create rainbow.html). After creating the new branch, our
repository’s history looks like:
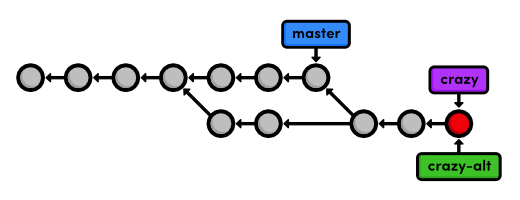
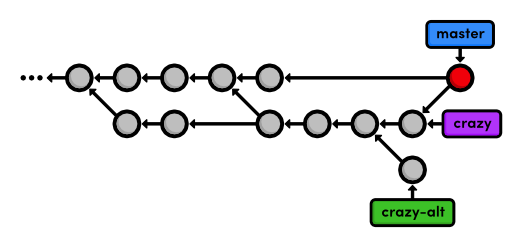
crazy-alt branchChange the Rainbow
Change the colorful list in rainbow.html from:
<ul><listyle="color: red">Red</li><listyle="color: orange">Orange</li><listyle="color: yellow">Yellow</li><listyle="color: green">Green</li><listyle="color: blue">Blue</li><listyle="color: indigo">Indigo</li><listyle="color: violet">Violet</li></ul>
to the following:
<divstyle="background-color: red"></div><divstyle="background-color: orange"></div><divstyle="background-color: yellow"></div><divstyle="background-color: green"></div><divstyle="background-color: blue"></div><divstyle="background-color: indigo"></div><divstyle="background-color: violet"></div>
Then, add some CSS formatting to <head> on the line after the
<meta> element:
<style>div{width:300px;height:50px;}</style>
If you open rainbow.html in a browser, you should now see
colorful blocks in place of the colorful text. Don’t forget to commit the
changes:
gitcommit-a-m"Make a REAL rainbow"
The resulting project history is show below, with the first four commits omitted for the sake of presentation.
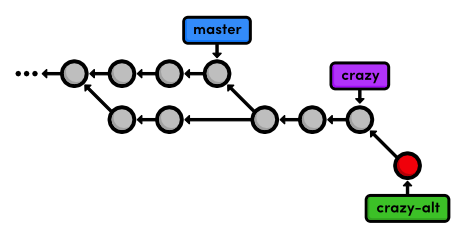
crazy-alt branchEmergency Update!
Our boss called in with some breaking news! He needs us to update
the site immediately, but what do we do with our rainbow.html
developments? Well, the beauty of Git branches is that we can just leave them
where they are and add the breaking news to master.
We’ll use what’s called a hotfix branch to
create and test the news updates. In contrast to our relatively long-running
feature branch (crazy), hotfix branches are used to quickly patch
a production release. For example, you’d use a hotfix branch to fix a
time-sensitive bug in a public software project. This distinction is useful for
demonstrating when it’s appropriate to create a new branch, but it is
purely conceptual—a branch is a branch according to Git.
gitcheckoutmastergitbranchnews-hotfixgitcheckoutnews-hotfix
Change the “News” list in index.html to match the
following.
<h2style="color: #C00">News</h2><ul><li><ahref="news-1.html">Blue Is The New Hue</a></li></ul>
And, create a new HTML page called news-1.html with the following
content.
<!DOCTYPE html><htmllang="en"><head><title>Blue Is The New Hue</title><linkrel="stylesheet"href="style.css"/><metacharset="utf-8"/></head><body><h1style="color: #079">Blue Is The New Hue</h1><p>European designers have just announced that<spanstyle="color: #079">Blue</span>will be this year's hot color.</p><p><ahref="index.html">Return to home page</a></p></body></html>
We can’t use git commit -a to automatically stage
news-1.html because it’s an untracked file (as
shown in git status). So, let’s use an explicit git
add:
gitaddindex.htmlnews-1.htmlgitstatusgitcommit-m"Add 1st news item"
Test these additions in a browser to make sure that the links work,
it’s typo free, etc. If everything looks good, we can
“publish” the changes by merging them into the stable
master branch. Isolating this in a separate branch isn’t
really necessary for our trivial example, but in the real world, this would
give you the opportunity to run build tests without touching your stable
project.
Publish the News Hotfix
Remember that to merge into the master branch, we first need to
check it out.
gitcheckoutmastergitmergenews-hotfix
Since master now contains the news update, we can delete the hotfix
branch:
gitbranch-dnews-hotfixgitbranch
The following diagram reflects our repository’s history before and after the merge. Can you figure out why was this a fast-forward merge instead of a 3-way merge?
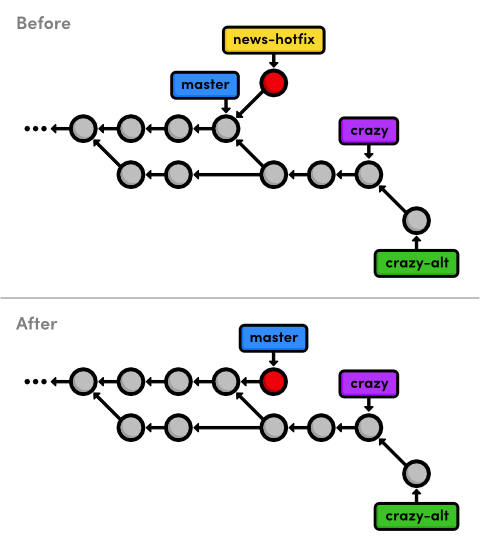
master to the
news-hotfix branchAlso notice that we have another fork in our history (the commit before
master
branches in two directions), which means we should expect to see another merge
commit in the near future.
Complete the Crazy Experiment
Ok, let’s finish up our crazy experiment with one more commit.
gitcheckoutcrazy
Note that the news article is nowhere to be found, as should be expected (this branch is a completely isolated development environment).
We’ll finish up our crazy experiment by adding a news item for it on the home
page. Change the news list in index.html to the following:
<h2style="color: #C00">News</h2><ul><li><ahref="rainbow.html">Our New Rainbow</a></li></ul>
Astute readers have probably observed that this directly conflicts with what
we changed in the news-hotfix branch. We should not
manually add in the other news item because it has no relationship with the
current branch. In addition, there would be no way to make sure the link works
because news-1.html doesn’t exist in this branch. This may
seem trivial, but imagine the errors that could be introduced had
news-hotfix made dozens of different changes.
We’ll simply stage and commit the snapshot as if there were no conflicts:
gitcommit-a-m"Add news item for rainbow"gitlog--oneline
Look at all those experimental commits (marked with asterisks below)!
*42fa173Add news item for rainbow*7147cc5Link index.html to rainbow.html*6aa4b3bAdd CSS stylesheet to rainbow.htmlb9ae1bcMerge branch 'master' into crazyae4e756Link HTML pages to stylesheet98cd46dAdd CSS stylesheet*33e25c9Rename crazy.html to rainbow.html*677e0e0Add a rainbow to crazy.html506bb9bRevert "Add a crazzzy experiment"*514fbe7Add a crazzzy experiment1c310d2Add navigation links54650a3Create blue and orange pagesb650e4bCreate index page
Publish the Crazy Experiment
We’re finally ready to merge our crazy branch back into
master.
gitcheckoutmastergitmergecrazy
You should get a message that reads:
Auto-merging index.html CONFLICT (content): Merge conflict in index.html Automatic merge failed; fix conflicts and then commit the result.
This is our first merge conflict. Conflicts occur when we
try to merge branches that have edited the same content. Git doesn’t know
how to combine the two changes, so it stops to ask us what to do. We can see
exactly what went wrong with the familiar git status command:
#On branchmaster#Changes to be committed:##new file: rainbow.html##Unmerged paths:# (use "git add/rm <file>..." as appropriate to mark resolution)##both modified: index.html#
We’re looking at the staged snapshot of a merge commit. We never saw this with the first 3-way merge because we didn’t have any conflicts to resolve. But now, Git stopped to let us modify files and resolve the conflict before committing the snapshot. The “Unmerged paths” section contains files that have a conflict.
Open up index.html and find the section that looks like:
<<<<<<< HEAD
<li><a href="news-1.html">Blue Is The New Hue</a></li>
=======
<li><a href="rainbow.html">Our New Rainbow</a></li>
>>>>>>> crazy
Git went ahead and modified the conflicted file to show us exactly which
lines are afflicted. The format of the above text shows us the difference
between the two versions of the file. The section labeled
<<<<<<< HEAD shows us the version in the
current branch, while the part after the ======= shows the version
in the crazy branch.
Resolve the Merge Conflicts
We can change the affected lines to whatever we want in order to resolve the
conflict. Edit the news section of index.html to keep changes from
both versions:
<h2style="color: #C00">News</h2><ul><li><ahref="news-1.html">Blue Is The New Hue</a></li><li><ahref="rainbow.html">Our New Rainbow</a></li></ul>
The <<<<<<<, =======, and
>>>>>>> markers are only used to show us the
conflict and should be deleted. Next, we need to tell Git that we’re done
resolving the conflict:
gitaddindex.htmlgitstatus
That’s right, all you have to do is add index.html to the
staged snapshot to mark it as resolved. Finally, complete the 3-way merge:
gitcommit
We didn’t use the -m flag to specify a message because
Git already gives us a default message for merge commits. It also gives us a
“Conflicts” list, which can be particularly handy when trying to
figure out where something went wrong in a project. Save and close the file to
create the merge commit.
The final state of our project looks like the following.
crazy branch into
masterCleanup the Feature Branches
Since our crazy experiment has been successfully merged, we can get rid of our feature branches.
gitbranch-dcrazygitbranch-dcrazy-alt
As noted in the last module, the git branch -d command
won’t let you delete a branch that contains unmerged changes. But, we
really do want to scrap the alternative experiment, so we’ll follow the
error message’s instructions for overriding this behavior:
gitbranch-Dcrazy-alt
Because we never merged crazy-alt into master, it
is lost forever. However, the crazy branch is still accessible
through its commits, which are now reachable via the master
branch. That is to say, it is still part of the structure of the
repository’s history, even though we deleted our reference to it.

Fast-forward merges are not reflected in the project history. This is the tangible distinction between fast-forward merges and 3-way merges. The next module will discuss the appropriate usage of both and the potential complications of a non-linear history.
Conclusion
This module demonstrated the three most common uses of Git branches:
- To develop long-running features (
crazy) - To apply quick updates (
news-hotfix) - To record the evolution of a project (
master)
In the first two cases, we needed an isolated environment to test some changes before integrating them with our stable code. As you get more comfortable with Git, you should find yourself doing virtually everything in an isolated topic branch, then merging it into a stable branch once you’re done. Practically, this means you’ll never have a broken version of your project.
We used the permanent master branch as the foundation for all
of these temporary branches, effectively making it the historian for our entire
project. In addition to master, many programmers often add a
second permanent branch called develop. This lets them use
master to record really stable snapshots (e.g., public
releases) and use develop as more of a preparation area for
master.
This module also introduced the 3-way merge, which combines two branches using a dedicated commit. The 3-way merge and the fast-forward merge are actually what makes branching so powerful: they let developers share and integrate independent updates with reliable results.
Next, we’ll learn how to clean up our repository’s history. Using a new Git command, we’ll be able to better manage merge commits and make sure our history is easy to navigate.
Quick Reference
git commit -a -m "<message>"- Stage all tracked files and commit the snapshot using the specified message.
git branch -D <branch-name>- Force the removal of an unmerged branch (be careful: it will be lost forever).