 |
You’re reading Ry’s Git Tutorial |
Patch Workflows
Thus far, all of the collaboration workflows we’ve seen rely heavily on branches. For example, in the last module, a contributor had to publish an entire branch for us to merge into our project. However, it’s also possible to communicate directly on the commit level using a patch.
A patch file represents a single set of changes (i.e., a commit) that can be applied to any branch, in any order. In this sense, the patch workflow is akin to interactive rebasing, except you can easily share patches with other developers. This kind of communication lessens the importance of a project’s branch structure and gives complete control to the project maintainer (at least with regards to incorporating contributions).
Integrating on the commit level will also give us a deeper understanding of how a Git repository records project history.

If you’ve been following along from the previous module, you already have everything you need. Otherwise, download the zipped Git repositories from the above link, uncompress them, and you’re good to go. If you’ve set up a Bitbucket account, you should also run the following commands to configure the downloaded repositories:
cd/path/to/my-git-repogitremoteaddoriginhttps://<username>@bitbucket.org/<username>/my-git-repo.gitcd../marys-repogitremoteaddoriginhttp://bitbucket.org/<username>/my-git-repo.git
Change the Pink Page (Mary)
We’ll begin by pretending to be Mary again. Mary didn’t like the pink page that John contributed and wants to change it.
cd/path/to/marys-repogitcheckout-bpink-page
Developing in a new branch not only gives Mary an isolated environment, it
also makes it easier to create a series of patches once she’s done
editing the pink page. Find these lines in pink.html:
<p>Pink is<spanstyle="color: #F0F">girly, flirty and fun</span>!</p>
and change them to the following.
<p>Only<spanstyle="color: #F0F">real men</span>wear pink!</p>
Stage and commit the update as normal.
gitcommit-a-m"Change pink to a manly color"
Note that Mary’s local development process doesn’t change at all. Patches—like the centralized and integrator workflows—are merely a way to share changes amongst developers. It has little effect on the core Git concepts introduced in the first portion of this tutorial.
Create a Patch (Mary)
Mary can create a patch from the new commit using the
git format‑patch command.
gitformat-patchmaster
This creates a file called
0001-Change-pink-to-a-manly-color.patch that contains enough
information to re-create the commit from the last step. The master
parameter tells Git to generate patches for every commit in the current branch
that’s missing from master.
Open up the patch file in a text editor. As shown by the addresses in the top of the file, it’s actually a complete email. This makes it incredibly easy to send patches to other developer. Further down, you should see the following.
index 98e10a1..828dd1a 100644--- a/pink.html+++ b/pink.html@@ -7,8 +7,7 @@</head> <body> <h1 style="color: #F0F">The Pink Page</h1>- <p>Pink is <span style="color: #F0F">girly,- flirty and fun</span>!</p>+ <p>Only <span style="color: #F0F">real men</span> wear pink!</p><p><a href="index.html">Return to home page</a></p> </body>
This unique formatting is called a diff, because
it shows the difference between two versions of a file. In our case,
it tells us what happened to the pink.html file between the
98e10a1 and 828dd1a commits (your patch will contain
different commit ID’s). The -7,8 +7,7 portion describes the
lines affected in the respective versions of the file, and the rest of the text
shows us the content that has been changed. The lines beginning with
- have been deleted in the new version, and the line starting with
+ has been added.
While you don’t have to know the ins-and-outs of diffs to make use of patches, you do need to understand that a single patch file represents a complete commit. And, since it’s a normal file (and also an email), it’s much easier to pass around than a Git branch.
Delete the patch file for now (we’ll re-create it later).
Add a Pink Block (Mary)
Before learning how to turn patches back into commits, Mary will add one more snapshot.
In pink.html, add the following on the line after the
<meta> tag.
<style>div{width:300px;height:50px;}</style>
And, add the next line of HTML after Only real men wear
pink!:
<divstyle="background-color: #F0F"></div>
Stage and commit the snapshot.
gitcommit-a-m"Add a pink block of color"
Mary’s repository now contains two commits after the tip of
master:
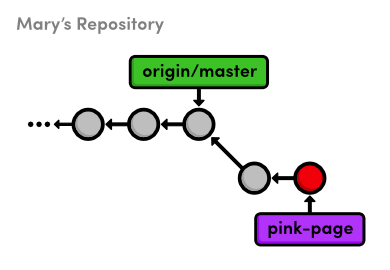
pink-page branchCreate Patch of Entire Branch (Mary)
Mary can use the same command as before to generate patches for all the
commits in her pink-page branch.
gitformat-patchmaster
The first patch is the exact same as we previously examined, but we also
have a new one called 0002-Add-a-pink-block-of-color.patch. Note
that the first line of the commit message will always be used to make a
descriptive filename for the patch. You should find the following diff in the
second patch.
index 828dd1a..2713b10 100644--- a/pink.html+++ b/pink.html@@ -4,10 +4,17 @@<title>The Pink Page</title> <link rel="stylesheet" href="style.css" /> <meta charset="utf-8" />+ <style>+ div {+ width: 300px;+ height: 50px;+ }+ </style></head> <body> <h1 style="color: #F0F">The Pink Page</h1> <p>Only <span style="color: #F0F">real men</span> wear pink!</p>+ <div style="background-color: #F0F"></div><p><a href="index.html">Return to home page</a></p> </body>
This is the same formatting as the first patch, except its lack of
- lines indicate that we only added HTML during the second commit.
As you can see, this patch is really just a machine-readable summary of our
actions from the previous section.
Mail the Patches (Mary)
Now that Mary has prepared a series of patches, she can send them to the project maintainer (us). In the typical patch workflow, she would send them via email using one of the following methods:
- Copying and pasting the contents of the patch files into an email client. If she uses this method, Mary would have to make sure that her email application doesn’t change the whitespace in the patch upon sending it.
- Sending the patch file as an attachment to a normal email.
- Using the convenient
git send-emailcommand and specifying a file or a directory of files to send. For example,git send-email .will send all the patches in the current directory. Git also requires some special configurations for this command. Please consult the official Git documentation for details.
The point is, the .patch files need to find their way into the
Git repository of whoever wants to add it to their project. For our example,
all we need to do is copy the patches into the my-git-repo
directory that represents our local version of the project.
Apply the Patches (You)
Copy the two patch files from marys-repo into
my-git-repo. Using the new git am command, we can use
these patches to add Mary’s commits to our repository.
cd../my-git-repogitcheckout-bpatch-integrationgitam<0001-Change-pink-to-a-manly-color.patchgitlogmaster..HEAD--stat
First, notice that we’re doing our integrating in a new topic branch.
Again, this ensures that we won’t destroy our existing functionality and
gives us a chance to approve changes. Second, the git am command
takes a patch file and creates a new commit from it. The log output shows us
that our integration branch contains Mary’s update, along with her author
information.
Let’s repeat the process for the second commit.
gitam<0002-Add-a-pink-block-of-color.patchgitlogmaster..HEAD--stat
The git am command is configured to read from something called
“standard input,” and the < character is how we can
turn a file’s contents into standard input. As it’s really more of
an operating system topic, you can just think of this syntax as a quirk of the
git am command.
After applying this patch, our integration branch now looks exactly like
Mary’s pink-page branch. We applied Mary’s patches in
the same order she did, but that didn’t necessarily have to be the case.
The whole idea behind patches is that they let you isolate a commit and move it
around as you please.
Integrate the Patches (You)
Once again, we’re in the familiar situation of integrating a topic
branch into the stable master branch.
gitcheckoutmastergitmergepatch-integrationgitbranch-dpatch-integrationgitclean-fgitpushoriginmaster
Mary’s updates are now completely integrated into our local
repository, so we can get rid of the patch files with git clean.
This was also an appropriate time to push changes to the public repository so
other developers can access the most up-to-date version of the project.
Update Mary’s Repository (Mary)
Mary might be tempted to merge her pink-page branch directly
into her master branch, but this would be a mistake. Her
master branch must track the “official”
repository’s master, as discussed in the previous
module.
cd../marys-repogitcheckoutmastergitfetchorigingitrebaseorigin/mastergitbranch-Dpink-pagegitclean-f
Patches are a convenient way to share commits amongst developers, but the
patch workflow still requires an “official” repository that
contains everybody’s changes. What would have happened if Mary
wasn’t the only one sending patches to us? We may very well have applied
several different patches or applied Mary’s contributions in a different
order. Using Mary’s pink-page to update her
master branch would completely ignore all these updates.
Taking this into consideration, our final patch workflow resembles the following.

Conclusion
Whereas remote repositories are a way to share entire branches, patches are a way to send individual commits to another developer. Keep in mind that patches are usually only sent to a project maintainer, who then integrates them into the “official” project for all to see. It would be impossible for everyone to communicate using only patches, as no one would be applying them in the same order. Eventually, everyone’s project history would look entirely different.
In many ways, patches are a simpler way to accept contributions than the integrator workflow from the previous module. Only the project maintainer needs a public repository, and he’ll never have to peek at anyone else’s repository. From the maintainer’s perspective, patches also provide the same security as the integrator workflow: he still won’t have to give anyone access to his “official” repository. But, now he won’t have to keep track of everybody’s remote repositories, either.
As a programmer, you’re most likely to use patches when you want to fix a bug in someone else’s project. After fixing it, you can send them a patch of the resulting commit. For this kind of one-time-fix, it’s much more convenient for you to generate a patch than to set up a public Git repository.
This module concludes our discussion of the standard Git workflows. Hopefully, you now have a good idea of how Git can better manage your personal and professional software projects using a centralized, integrator, or patch workflow. In the next module, we’ll switch gears and introduce a variety of practical Git commands.
Quick Reference
git format-patch <branch-name>- Create a patch for each commit contained in the current branch but not
in
<branch-name>. You can also specify a commit ID instead of<branch-name>. git am < <patch-file>- Apply a patch to the current branch.