 |
You’re reading Ry’s Git Tutorial |
Distributed Workflows
Now that we know how to share information via a centralized workflow, we can appreciate some of the drawbacks of this collaboration model. While it may be convenient, allowing everyone to push to an “official” repository raises some legitimate security concerns. It means that for anyone to contribute content, they need access to the entire project.
This is fine if you’re only interacting with a small team, but imagine a scenario where you’re working on an open-source software project and a stranger found a bug, fixed it, and wants to incorporate the update into the main project. You probably don’t want to give them push-access to your central repository, since they could start pushing all sorts of random snapshots, and you would effectively lose control of the project.
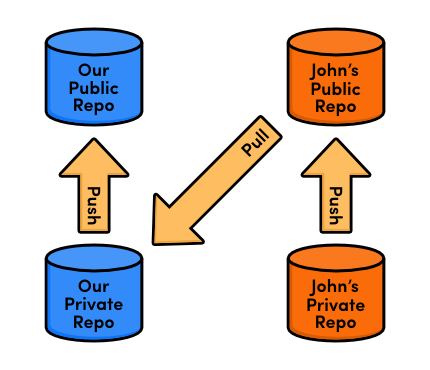
But, what you can do is tell the contributor to push the changes to their own public repository. Then, you can pull their bug fix into your private repository to ensure it doesn’t contain any undeclared code. If you approve their contributions, all you have to do is merge them into a local branch and push it to the main repository, just like we did in the previous module. You’ve become an integrator, in addition to an ordinary developer:

In this module, we’ll experience all of this first-hand by creating a free public repository on Bitbucket.org and incorporating a contribution from an anonymous developer named John. Bitbucket is a DVCS hosting provider that makes it very easy to set up a Git repository and start collaborating with a team of developers.

If you’ve been following along from the previous module, you already have everything you need. Otherwise, download the zipped Git repositories from the above link, uncompress them, and you’re good to go.
Create a Bitbucket Account
The first part of this module will walk you through setting up a Bitbucket account. Navigate your web browser to Bitbucket.org and sign up for a free account.
You can choose any username for your account, but the email address should
match the one you assigned to your Git installation with git
config in The Basics. If you need to
change your email, you can run another git config --global user.email
you@example.com command.
Create a Public Repository (You)
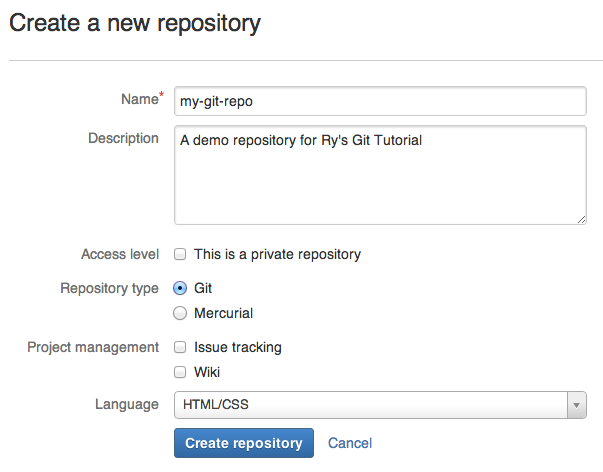
To create our first networked Git repository, log into your Bitbucket
account, and navigate to Repositories > Create
repository. Use my-git-repo as the Repository Name,
and anything you like for the Description field. Since this is just an
example project, go ahead and uncheck the This is a private repository
field. Select HTML/CSS for the Language field, then go ahead
and click Create repository.
Essentially, we just ran git init --bare on a Bitbucket server.
We can now push to and fetch from this repository as we did with
central-repo.git in the previous module.
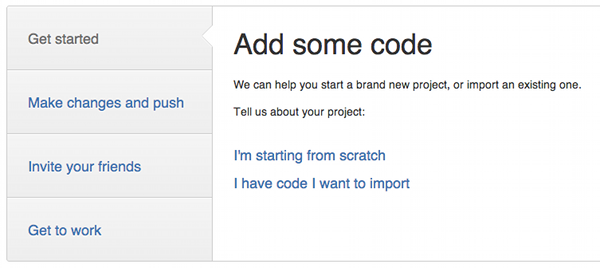
After initialization, Bitbucket offers some helpful instructions, but don’t follow them just yet—we’ll walk through importing an existing repository in the next section.
Push to the Public Repository (You)
Before populating this new repository with our existing
my-git-repo project, we first need to point our
origin remote to the Bitbucket repository. Be sure to change the
<username> portion to your actual Bitbucket username.
cd/path/to/my-git-repogitremotermorigingitremoteaddoriginhttps://<username>@bitbucket.org/<username>/my-git-repo.git
The utility of remotes should be more apparent than in previous modules, as typing the full path to this repository every time we needed to interact with it would be rather tedious.
To populate the remote repository with our existing code, we can use the same push mechanism as with a centralized workflow. When prompted for a password, use the one that you signed up with.
gitpushoriginmaster
Browse the Public Repository (You)
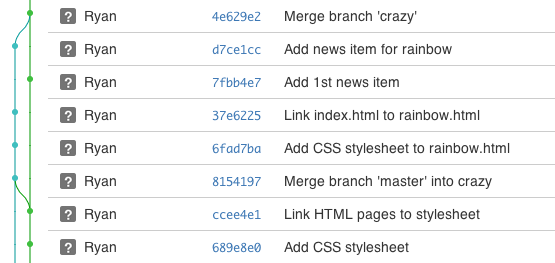
We should now be able to see our project on the Bitbucket site. The Source tab displays all of the files in the project, and the Commits tab contains the entire commit history. Note that the branch structure of the repository is also visualized to the left of each commit.
This repository now serves as the “official” copy of our example
website. We’ll tell everyone else to download from this repository, and
we’ll push all the changes from our local my-git-repo to it.
However, it’s important to note that this “official” status
is merely a convention. As the master branch is just another
branch, our Bitbucket repository is just another repository according to Git.
Having both a public and a private repository for each developer makes it easy to incorporate contributions from third-parties, even if you’ve never met them before.
Clone the Repository (John)
Next, we’re going to pretend to be John, a third-party contributor to our website. John noticed that we didn’t have a pink page and, being the friendly developer that he is, wants to create one for us. We’d like to let him contribute, but we don’t want to give him push-access to our entire repository—this would allow him to re-write or even delete all of our hard work.
Fortunately, John knows how to exploit Bitbucket’s collaboration potential. He’ll start by cloning a copy of our public repository:
cd/path/to/my-git-repocd..gitclonehttp://bitbucket.org/<username>/my-git-repo.gitjohns-repocdjohns-repo
You should now have another copy of our repository called
johns-repo in the same folder as my-git-repo. This is
John’s private repository—a completely isolated
environment where he can safely develop the pink page. Let’s quickly
configure his name and email:
gitconfiguser.name"John"gitconfiguser.emailjohn.example@rypress.com
Add the Pink Page (John)
Of course, John should be developing his contributions in a dedicated feature branch.
gitcheckout-bpink-page
In addition to being a best practice, this makes it easy for the integrator to see what commits to include. When John’s done, he’ll tell us where to find his repository and what branch the new feature resides in. Then, we’ll be able merge his content with minimal effort.
Create the file pink.html and add the following code:
<!DOCTYPE html><htmllang="en"><head><title>The Pink Page</title><linkrel="stylesheet"href="style.css"/><metacharset="utf-8"/></head><body><h1style="color: #F0F">The Pink Page</h1><p>Pink is<spanstyle="color: #F0F">girly, flirty and fun</span>!</p><p><ahref="index.html">Return to home page</a></p></body></html>
Add the pink page to the “Navigation” section in
index.html:
<listyle="color: #F0F"><ahref="pink.html">The Pink Page</a></li>
Then, stage and commit the snapshot as normal.
gitaddpink.htmlindex.htmlgitstatusgitcommit-m"Add pink page"
Publish the Pink Page (John)
Now, John needs to publish his contributions to a public repository.
Remember that we don’t want him to push to our public
repository, which is stored in his origin remote. In fact, he
can’t push to origin for reasons we’ll
discuss in a moment.
Instead, he’ll create his own Bitbucket repository that we can pull
contributions from. In the real world, John would have his own Bitbucket
account, but for convenience, we’ll just store his public repository
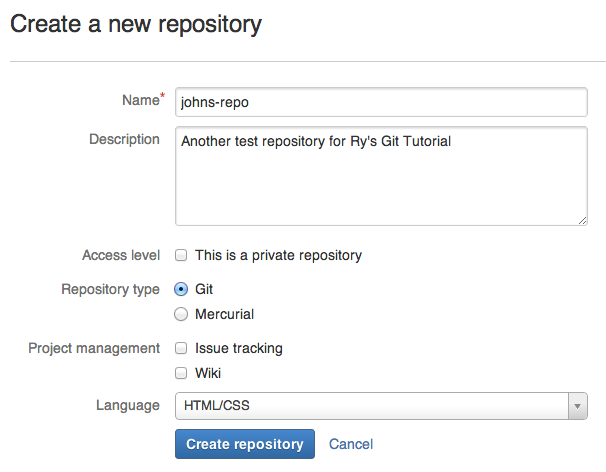
under our existing account. Once again, navigate to your Bitbucket home page
and click Repositories > Create repository to create
John’s public repository. For the Name field, use
johns-repo.
Back in John’s private repository, we’ll need to add this as a remote:
gitremoteaddjohn-publichttps://<username>@bitbucket.org/<username>/johns-repo.git
This is where John will publish the pink page for us to access. Since he’s pushing with HTTPS, he’ll need to enter the password for his Bitbucket account (which is actually the password for your account).
gitpushjohn-publicpink-page
All John needs to do now is tell us the name of the feature branch and send us a link to his repository, which will be:
http://bitbucket.org/<username>/johns-repo.git
Note that John used a different path for pushing to his public repository
than the one he gave us for fetching from it. The most important distinction is
the transport protocol: the former used https:// while the latter
used http://. Accessing a repository over HTTPS (or SSH) lets you
fetch or push, but as we saw, requires a password. This prevents unknown
developers from overwriting commits.
On the other hand, fetching over HTTP requires no username or password, but
pushing is not possible. This lets anyone fetch from a repository without
compromising its security. In the integrator workflow, other developers access
your repository via HTTP, while you publish changes via HTTPS. This is also the
reason why John can’t push to his origin remote.
Of course, if you’re working on a private project, anonymous HTTP access would be disabled for that repository.
View John’s Contributions (You)
Ok, we’re done being John and we’re ready to integrate his code into the official project. Let’s start by switching back into our repository and adding John’s public repository as a remote.
cd../my-git-repogitremoteaddjohnhttp://bitbucket.org/<username>/johns-repo.git
Note that we don’t care about anything in John’s private repository—the only thing that matters are his published changes. Let’s download his branches and take a look at what he’s been working on:
gitfetchjohngitbranch-rgitlogmaster..john/pink-page--stat
We can visualize this history information as the following.
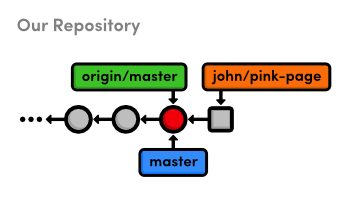
pink-page
branchLet’s take a look at his actual changes:
gitcheckoutjohn/pink-page
Open up the pink.html file to see if it’s ok. Remember
that John isn’t a trusted collaborator, and we would normally have no
idea what this file might contain. With that in mind, it’s incredibly
important to verify its contents. Never blindly merge content from
a third-party contributor.
Integrate John’s Contributions (You)
Assuming we approve John’s updates, we’re now ready to merge it into the project.
gitcheckoutmastergitmergejohn/pink-page
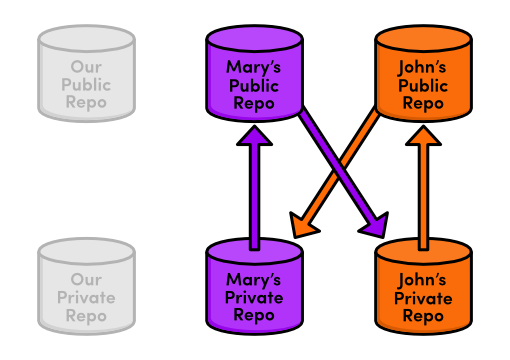
Notice that is the exact same way we incorporated Mary’s changes in the centralized workflow, except now we’re pulling from and pushing to different locations:
Furthermore, John’s workflow is just like ours: develop in a local, private repository, then push changes to the public one. The integrator workflow is merely a standardized way of organizing the collaboration effort—nothing has changed about how we develop locally, and we’re using the same Git commands as we have been for the last few modules.
Publish John’s Contributions (You)
We’ve integrated John’s contribution into our local
my-git-repo repository, but no one else knows what we’ve
done. It’s time to publish our master branch again.
gitpushoriginmaster
Since we designated our public Bitbucket repository as the “official” source for our project, everyone (i.e., Mary and John) will now be able to synchronize with it.
Update Mary’s Repository (Mary)
Mary should now be pulling changes from our Bitbucket repository instead of the central one from the previous module. This should be fairly easy for her to configure.
cd../marys-repogitremotermorigingitremoteaddoriginhttp://bitbucket.org/<username>/my-git-repo.git
Again, remember to change <username> to your Bitbucket
account’s username. For the sake of brevity, we’ll do a blind merge
to add John’s updates to Mary’s repository (normally, Mary should
check what she’s integrating before doing so).
gitcheckoutmastergitfetchorigingitrebaseorigin/master
For Mary, it doesn’t really matter that the updates came from John.
All she has to know is that the “official” master
branch moved forward, prompting her to synchronize her private repository.
Update John’s Repository (John)
John still needs to incorporate the pink page into his master
branch. He should not merge directly from his pink-page
topic branch because we could have edited his contribution before publishing it
or included other contributions along with it. Instead, he’ll pull from
the “official” master:
cd../johns-repogitcheckoutmastergitfetchorigingitrebaseorigin/master
If John had updated master directly from his local
pink-page, it could have wound up out-of-sync from the main
project. For this reason, the integrator workflow requires that everyone
pull from a single, official repository, while they all push
to their own public repositories:
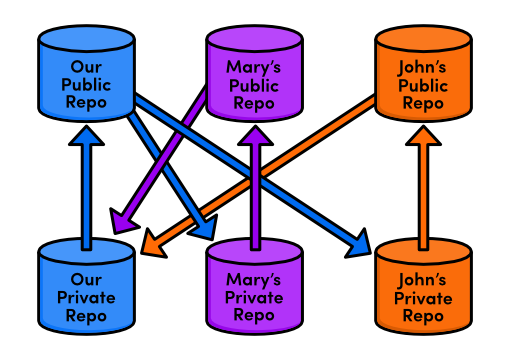
In this way, additions from one contributor can be approved, integrated, and made available to everyone without interrupting anyone’s independent developments.
Conclusion
Using the integrator workflow, our private development process largely
remains the same (develop a feature branch, merge it into master,
and publish it). But, we’ve added an additional task: incorporating
changes from third-party contributors. Luckily, this doesn’t require any
new skills—just access to a few more remote repositories.
While this setup forces us to keep track of more remotes, it also makes it much, much easier to work with a large number of developers. You’ll never have to worry about security using an integrator workflow because you’ll still be the only one with access to the “official” repository.
There’s also an interesting side-effect to this kind of security. By giving each developer their own public repository, the integrator workflow creates a more stable development environment for open-source software projects. Should the lead developer stop maintaining the “official” repository, any of the other participants could take over by simply designating their public repository as the new “official” project. This is part of what makes Git a distributed version control system: there is no single central repository that Git forces everyone to rely upon.
In the next module, we’ll take a look at an even more flexible way to share commits. This low-level approach will also give us a better understanding of how Git internally manages our content.