 |
You’re reading Ry’s Git Tutorial |
Plumbing
In Rewriting History, I talked about the internal representation of a Git repository. I may have mislead you a bit. While the reflog, interactive rebasing, and resetting may be more complex features of Git, they are still considered part of the porcelain, as is every other command we’ve covered. In this module, we’ll take a look at Git’s plumbing—the low-level commands that give us access to Git’s true internal representation of a project.
Unless you start hacking on Git’s source code, you’ll probably never need to use the plumbing commands presented below. But, manually manipulating a repository will fill in the conceptual details of how Git actually stores your data, and you should walk away with a much better understanding of the techniques that we’ve been using throughout this tutorial. In turn, this knowledge will make the familiar porcelain commands even more powerful.
We’ll start by inspecting Git’s object database, then we’ll manually create and commit a snapshot using only Git’s low-level interface.

If you’ve been following along from the previous module, you already have everything you need. Otherwise, download the zipped Git repository from the above link, uncompress it, and you’re good to go.
Examine Commit Details
First, let’s take a closer look at our latest commit with the
git cat-file plumbing command.
gitcat-filecommitHEAD
The commit parameter tells Git that we want to see a commit
object, and as we already know, HEAD refers to the most recent
commit. This will output the following, although your IDs and user information
will be different.
tree 552acd444696ccb1c3afe68a55ae8b20ece2b0e6
parent 6a1d380780a83ef5f49523777c5e8d801b7b9ba2
author Ryan <ryan.example@rypress.com> 1326496982 -0600
committer Ryan <ryan.example@rypress.com> 1326496982 -0600

Add .gitignore file
This is the complete representation of a commit: a tree, a parent, user data, and a commit message. The user information and commit message are relatively straightforward, but we’ve never seen the tree or parent values before.
A tree object is Git’s representation of the “snapshots” we’ve been talking about since the beginning of this tutorial. They record the state of a directory at a given point, without any notion of time or author. To tie trees together into a coherent project history, Git wraps each one in a commit object and specifies a parent, which is just another commit. By following the parent of each commit, you can walk through the entire history of a project.
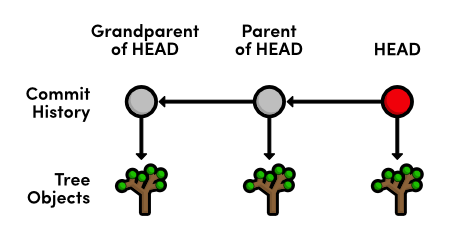
Notice that each commit refers to one and only one tree object. From the
git cat-file output, we can also infer that trees use SHA-1
checksums for their ID’s. This will be the case for all of Git’s
internal objects.
Examine a Tree
Next, let’s try to inspect a tree using the same git
cat-file command. Make sure to change 552acd4 to the ID of
your tree from the previous step.
gitcat-filetree552acd4
Unfortunately, trees contain binary data, which is quite ugly when displayed in its raw form. So, Git offers another useful plumbing command:
gitls-tree552acd4
This will output the contents of the tree, which looks an awful lot like a directory listing:
100644 blob 99ed0d431c5a19f147da3c4cb8421b5566600449    .gitignore
040000 tree ab4947cb27ef8731f7a54660655afaedaf45444d    about
100644 blob cefb5a651557e135666af4c07c7f2ab4b8124bd7    blue.html
100644 blob cb01ae23932fd9704fdc5e077bc3c1184e1af6b9    green.html
100644 blob e993e5fa85a436b2bb05b6a8018e81f8e8864a24    index.html
100644 blob 2a6deedee35cc59a83b1d978b0b8b7963e8298e9    news-1.html
100644 blob 0171687fc1b23aa56c24c54168cdebaefecf7d71    news-2.html
...
By examining the above output, we can presume that “blobs”
represent files in our repository, whereas trees represent folders. Go ahead
and examine the about tree with another git ls-tree
to see if this really is the case. You should see the contents of our
about folder.
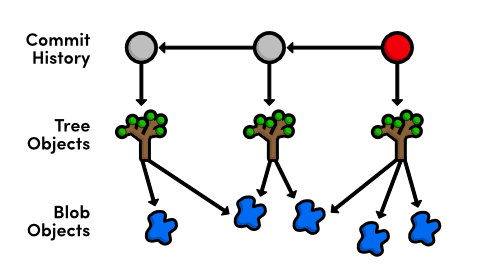
So, blob objects are how Git stores our file data, tree objects combine blobs and other trees into a directory listing, then commit objects tie trees into a project history. These are the only types of objects that Git needs to implement nearly all of the porcelain commands we’ve been using, and their relationship is summed up as follows:

Examine a Blob
Let’s take a look at the blob associated with blue.html
(be sure to change the following to the ID next to blue.html in
your tree output).
gitcat-fileblobcefb5a6
This should display the entire contents of blue.html,
confirming that blobs really are plain data files. Note that blobs are pure
content: there is no mention of a filename in the above output. That is to say,
the name blue.html is stored in the tree that contains the
blob, not the blob itself.
You may recall from The Basics that an SHA-1 checksum ensures an object’s contents is never corrupted without Git knowing about it. Checksums work by using the object’s contents to generate a unique character sequence. This not only functions as an identifier, it also guarantees that an object won’t be silently corrupted (the altered content would generate a different ID).
When it comes to blob objects, this has an additional benefit. Since two
blobs with the same data will have the same ID, Git must share blobs
across multiple trees. For example, our blue.html file
hasn’t been changed since it was created, so our repository will only
have a single associated blob, and all subsequent trees will refer to it. By
not creating duplicate blobs for each tree object, Git vastly reduces the size
of a repository. With this in mind, we can revise our Git object diagram to the
following.
However, as soon as you change a single line in a file, Git must create a new blob object because its contents will have changed, resulting in a new SHA-1 checksum.
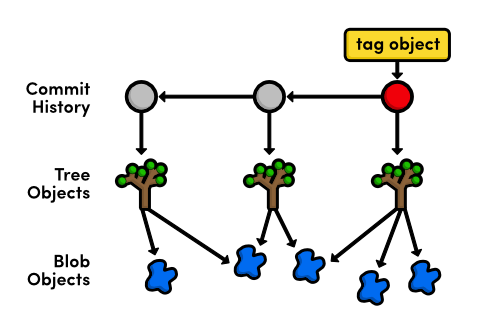
Examine a Tag
The fourth and final type of Git object is the tag object
We can use the same git cat-file command to show the details of a
tag.
gitcat-filetagv2.0
This will output the commit ID associated with v2.0, along with
the tag’s name, author, creation date, and message. The straightforward
relationship between tags and commits gives us our finalized Git object
diagram:
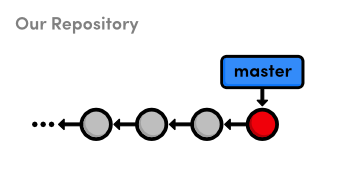
Inspect Git’s Branch Representation
We now have the tools to fully explore Git’s branch representation.
Using the -t flag, we can determine what kind of object Git uses
for branches.
gitcat-file-tmaster
That’s right, a branch is just a reference to a commit object, which
means we can view it with a normal git cat-file.
gitcat-filecommitmaster
This will output the exact same information as our original git
cat-file commit HEAD. It seems that both the master branch
and HEAD are simply references to a commit object.
Using a text editor, open up the .git/refs/heads/master file.
You should find the commit checksum of the most recent commit, which you can
view with git log -n 1. This single file is all Git needs to
maintain the master branch—all other information is
extrapolated through the commit object relationships discussed above.
The HEAD reference, on the other hand, is recorded in
.git/HEAD. Unlike the branch tips, HEAD is not a
direct link to a commit. Instead, it refers to a branch, which Git uses to
figure out which commit is currently checked out. Remember that a
detached HEAD state occurred when HEAD did not
coincide with the tip of any branch. Internally, all this means to Git is that
.git/HEAD doesn’t contain a local branch. Try checking out
an old commit:
gitcheckoutHEAD~1
Now, .git/HEAD should contain a commit ID instead of a branch.
This tells Git that we’re in a detached HEAD state.
Regardless of what state you’re in, the git checkout command
will always record the checked-out reference in .git/HEAD.
Let’s get back to our master branch before moving on:
gitcheckoutmaster
Explore the Object Database
While we have a basic understanding of Git’s object interaction, we
have yet to explore where Git keeps all of these objects. In your
my-git-repo repository, open the folder .git/objects.
This is Git’s object database.
Each object, regardless of type, is stored as a file, using its SHA-1 checksum as the filename (sort of). But, instead of storing all objects in a single folder, they are split up using the first two characters of their ID as a directory name, resulting in an object database that looks something like the following.
00  10  28  33  3e  51  5c  6e  77  85  95  f7
01  11  29  34  3f  52  5e  6f  79  86  96  f8
02  16  2a  35  41  53  63  70  7a  87  98  f9
03  1c  2b  36  42  54  64  71  7c  88  99  fa
0c  26  30  3c  4e  5a  6a  75  83  91  a0  info
0e  27  31  3d  50  5b  6b  76  84  93  a2  pack
For example, an object with the following ID:
7a52bb857229f89bffa74134ee3de48e5e146105
is stored in a folder called 7a, using the remaining characters
(52bb8...) as a filename. This gives us an object ID, but before
we can inspect items in the object database, we need to know what type of
object it is. Again, we can use the -t flag:
gitcat-file-t7a52bb8
Of course, change the object ID to an object from your database
(don’t forget to combine the folder name with the filename to get the
full ID). This will output the type of commit, which we can then pass to a
normal call to git cat-file.
gitcat-fileblob7a52bb8
My object was a blob, but yours may be different. If it’s a tree,
remember to use git ls-tree to turn that ugly binary data into a
pretty directory listing.
Collect the Garbage
As your repository grows, Git may automatically transfer your object files
into a more compact form know as a “pack” file. You can force this
compression with the garbage collection command, but beware: this command is
undo-able. If you want to continue exploring the contents of the
.git/objects folder, you should do so before running the following
command. Normal Git functionality will not be affected.
gitgc
This compresses individual object files into a faster, smaller pack file and removes dangling commits (e.g., from a deleted, unmerged branch).
Of course, all of the same object ID’s will still work with git
cat-file, and all of the porcelain commands will remain unaffected. The
git gc command only changes Git’s storage
mechanism—not the contents of a repository. Running git gc
every now and then is usually a good idea, as it keeps your repository
optimized.
Add Files to the Index
Thus far, we’ve been discussing Git’s low-level representation of committed snapshots. The rest of this module will shift gears and use more “plumbing” commands to manually prepare and commit a new snapshot. This will give us an idea of how Git manages the working directory and the staging area.
Create a new file called news-4.html in
my-git-repo and add the following HTML.
<!DOCTYPE html><htmllang="en"><head><title>Indigo Invasion</title><linkrel="stylesheet"href="style.css"/><metacharset="utf-8"/></head><body><h1style="color: #A0C">Indigo Invasion</h1><p>Last week, a coalition of Asian designers, artists, and advertisers announced the official color of Asia:<spanstyle="color: #A0C">Indigo</span>.</p><p><ahref="index.html">Return to home page</a></p></body></html>
Then, update the index.html “News” section to match
the following.
<h2style="color: #C00">News</h2><ul><li><ahref="news-1.html">Blue Is The New Hue</a></li><li><ahref="rainbow.html">Our New Rainbow</a></li><li><ahref="news-2.html">A Red Rebellion</a></li><li><ahref="news-3.html">Middle East's Silent Beast</a></li><li><ahref="news-4.html">Indigo Invasion</a></li></ul>
Instead of git add, we’ll use the low-level git
update-index command to add files to the staging area. The
index is Git’s term for the staged snapshot.
gitstatusgitupdate-indexindex.htmlgitupdate-indexnews-4.html
The last command will throw an error—Git won’t let you add a new file to the index without explicitly stating that it’s a new file:
gitupdate-index--addnews-4.htmlgitstatus
We’ve just moved the working directory into the index, which means we
have a snapshot prepared for committal. However, the process won’t be
quite as simple as a mere git commit.
Store the Index in the Database
Remember that all commits refer to a tree object, which represents the snapshot for that commit. So, before creating a commit object, we need to add our index (the staged tree) to Git’s object database. We can do this with the following command.
gitwrite-tree
This command creates a tree object from the index and stores it in
.git/objects. It will output the ID of the resulting tree (yours
may be different):
5f44809ed995e5b861acf309022ab814ceaaafd6
You can examine your new snapshot with git ls-tree. Keep in
mind that the only new blobs created for this commit were
index.html and news-4.html. The rest of the tree
contains references to existing blobs.
gitls-tree5f44809
So, we have our tree object, but we have yet to add it to the project history.
Create a Commit Object
To commit the new tree object, we need to manually figure out the ID of the parent commit.
gitlog--oneline-n1
This will output the following line, though your commit ID will be different. We’ll use this ID to specify the parent of our new commit object.
3329762 Add .gitignore file
The git commit-tree command creates a commit object from a tree
and a parent ID, while the author information is taken from an environment
variable set by Git. Make sure to change 5f44809 to your tree ID,
and 3329762 to your most recent commit ID.
gitcommit-tree5f44809-p3329762
This command will wait for more input: the commit message. Type Add
4th news item and press Enter to create the commit message,
then Ctrl-Z and Enter for Windows or
Ctrl-D for Unix to specify an “End-of-file” character
to end the input. Like the git write-tree command, this will
output the ID of the resulting commit object.
c51dc1b3515f9f8e80536aa7acb3d17d0400b0b5
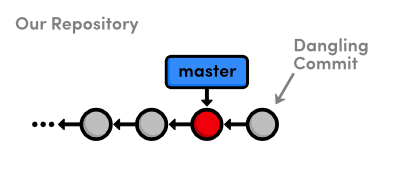
You’ll now be able to find this commit in .git/objects,
but neither HEAD nor the branches have been updated to include
this commit. It’s a dangling commit at this point. Fortunately
for us, we know where Git stores its branch information.
Update HEAD
Since we’re not in a detached HEAD state,
HEAD is a reference to a branch. So, all we need to do to update
HEAD is move the master branch forward to our new
commit object. Using a text editor, replace the contents of
.git/refs/heads/master with the output from git
commit-tree in the previous step.
If this file seems to have disappeared, don’t fret! This just means
that the git gc command packed up all of our branch references
into single file. Instead of .git/refs/heads/master, open up
.git/packed-refs, find the line with
refs/heads/master, and change the ID to the left of it.
Now that our master branch points to the new commit, we should
be able to see the news-4.html file in the project history.
gitlog-n2
The last four sections explain everything that happens behind the scenes
when we execute git commit -a -m "Some Message". Aren’t you
glad you won’t have to use Git’s plumbing ever again?
master branchConclusion
After this module, you hopefully have a solid grasp of the object database that underlies almost every Git command. We examined commits, trees, blobs, tags, and branches, and we even created a commit object from scratch. All of this was meant to give you a deeper understanding of Git’s porcelain commands, and you should now feel ready to adapt Git to virtually any task you could possibly demand from a version control system.
As you migrate these skills to real-world projects, remember that Git is merely a tool for tracking your files, not a cure-all for managing software projects. No amount of intimate Git knowledge can make up for a haphazard set of conventions within a development team.
Thus concludes our journey through Git-based revision control. This tutorial was meant to prepare you for the realities of distributed software development—not to transform you into a Git expert overnight. You should be able to manage your own projects, collaborate with other Git users, and, perhaps most importantly, understand exactly what any other piece of Git documentation is trying to convey.
Your job now is to take these skills and apply them to new projects, sift through complex histories that you’ve never seen before, talk to other developers about their Git workflows, and take the time to actually try all of those “I wonder what would have happened if…” scenarios. Good luck!
Quick Reference
git cat-file <type> <object-id>- Display the specified object, where
<type>is one ofcommit,tree,blob, ortag. git cat-file -t <object-id>- Output the type of the specified object.
git ls-tree <tree-id>- Display a pretty version of the specified tree object.
git gc- Perform a garbage collection on the object database.
git update-index [--add] <file>- Stage the specified file, using the optional
--addflag to denote a new untracked file. git write-tree- Generate a tree from the index and store it in the object database. Returns the ID of the new tree object.
git commit-tree <tree-id> -p <parent-id>- Create a new commit object from the given tree object and parent commit. Returns the ID of the new commit object.