 |
You’re reading Ry’s Git Tutorial |
Undoing Changes
In the last module, we learned how to record versions of a project into a Git repository. The whole point of maintaining these “safe” copies is peace of mind: should our project suddenly break, we’ll know that we have easy access to a functional version, and we’ll be able to pinpoint precisely where the problem was introduced.
To this end, storing “safe” versions isn’t much help without the ability to restore them. Our next task is to learn how to view the previous states of a project, revert back to them, and reset uncommitted changes.

If you’ve been following along from the previous module, you already have everything you need. Otherwise, download the zipped Git repository from the above link, uncompress it, and you’re good to go.
Display Commit Checksums
As a quick review, let’s display our repository’s history.
Navigate a command prompt (or Git Bash) to the my-git-repo folder
and run the following.
gitlog--oneline
The output for this should look similar to the following, but contain different commit checksums.
1c310d2Add navigation links54650a3Create blue and orange pagesb650e4bCreate index page
Git only outputs the first 7 characters of the checksum (remember that you
can see the full version with the default formatting of git log).
These first few characters effectively serve as a unique ID for each
commit.
View an Old Revision
Using the new git checkout command, we can view the contents of
a previous snapshot. Make sure to change 54650a3 in the following
command to the ID of your second commit.
gitcheckout54650a3
This will output a lot of information about a detached HEAD
state. You can ignore it for now. All you need to know is that the above
command turns your my-git-repo directory into an exact replica of
the second snapshot we committed in The
Basics.
Open the HTML files in a text editor or web browser to verify that the
navigation links we added in the third commit have disappeared. Running
git log will also tell us that the third commit is no longer part
of the project. After checking out the second commit, our repository history
looks like the following (the red circle represents the current commit).

View an Older Revision
Let’s go even farther back in our history. Be sure to change
b650e4b to the ID of your first commit.
gitcheckoutb650e4b
Now, the blue.html and orange.html files are gone,
as is the rest of the git log history.

In the last module, we said that Git was designed to never lose a committed
snapshot. So, where did our second and third snapshots go? A simple git
status will answer that question for us. It should return the following
message:
#Not currently on any branch.nothing to commit (working directory clean)
Compare this with the status output from the previous module:
#On branchmasternothing to commit (working directory clean)
All of our actions in The Basics took place on the
master branch, which is where our second and third commits still
reside. To retrieve our complete history, we just have to check out this
branch. This is a very brief introduction to branches, but it’s all we
need to know to navigate between commits. The next module will discuss branches
in full detail.
Return to Current Version
We can use the same git checkout command to return to the
master branch.
gitcheckoutmaster
This makes Git update our working directory to reflect the state of the
master branch’s snapshot. It re-creates the
blue.html and orange.html files for us, and the
content of index.html is updated as well. We’re now back to
the current state of the project, and our history looks like:

Tag a Release
Let’s call this a stable version of the example website. We can make it official by tagging the most recent commit with a version number.
gittag-av1.0-m"Stable version of the website"
Tags are convenient references to official releases and other significant
milestones in a software project. It lets developers easily browse and check
out important revisions. For example, we can now use the v1.0 tag
to refer to the third commit instead of its random ID. To view a list of
existing tags, execute git tag without any arguments.
In the above snippet, the -a flag tells Git to create an
annotated tag, which lets us record our name, the date, and a
descriptive message (specified via the -m flag). We’ll use
this tag to find the stable version after we try some crazy experiments.
Try a Crazy Experiment
We’re now free to add experimental changes to the example site without
affecting any committed content. Create a new file called
crazy.html and add the following HTML.
<!DOCTYPE html><htmllang="en"><head><title>A Crazy Experiment</title><metacharset="utf-8"/></head><body><h1>A Crazy Experiment</h1><p>We're trying out a<spanstyle="color: #F0F">crazy</span><spanstyle="color: #06C">experiment</span>!<p><ahref="index.html">Return to home page</a></p></body></html>
Stage and Commit the Snapshot
Stage and commit the new file as usual.
gitaddcrazy.htmlgitstatusgitcommit-m"Add a crazzzy experiment"gitlog
It’s a good practice to run git status to see exactly
what you’re committing before running git commit -m. This
will keep you from unintentionally committing a file that doesn’t belong
in the current snapshot.
As expected, the new snapshot shows up in the repository’s history. If
your log history takes up more than one screen, you can scroll down by pressing
Space and return to the command line by pressing the letter
q.
View the Stable Commit
Let’s go back and take a look at our stable revision. Remember that
the v1.0 tag now serves as a user-friendly shortcut to the third
commit’s ID.
gitcheckoutv1.0
After seeing the stable version of the site, we decide to scrap the crazy
experiment. But, before we undo the changes, we need to return to the
master branch. If we didn’t, all of our updates would be on
some non-existent branch. As we’ll discover next module, you should
never make changes directly to a previous revision.
gitcheckoutmastergitlog--oneline
At this point, our history should look like the following:
514fbe7Add a crazzzy experiment1c310d2Add navigation links54650a3Create blue and orange pagesb650e4bCreate index page
Undo Committed Changes
We’re ready to restore our stable tag by removing the most recent
commit. Make sure to change 514fbe7 to the ID of the crazy
experiment’s commit before running the next command.
gitrevert514fbe7
This will prompt you for a commit message with a default of Revert
"Add a crazzzy experiment".... You can leave the default message and
close the file. After verifying that crazy.html is gone, take a
look at your history with git log --oneline.
506bb9bRevert "Add a crazzzy experiment"514fbe7Add a crazzzy experiment1c310d2Add navigation links54650a3Create blue and orange pagesb650e4bCreate index page
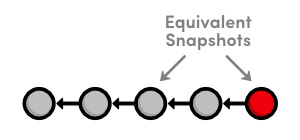
Notice that instead of deleting the “crazzzy experiment” commit, Git figures out how to undo the changes it contains, then tacks on another commit with the resulting content. So, our fifth commit and our third commit represent the exact same snapshot, as shown below. Again, Git is designed to never lose history: the fourth snapshot is still accessible, just in case we want to continue developing it.
When using git revert, remember to specify the commit that you
want to undo—not the stable commit that you want to return to. It helps
to think of this command as saying “undo this commit” rather than
“restore this version.”
Start a Smaller Experiment
Let’s try a smaller experiment this time. Create
dummy.html and leave it as a blank file. Then, add a link in the
“Navigation” section of index.html so that it
resembles the following.
<h2>Navigation</h2><ul><listyle="color: #F90"><ahref="orange.html">The Orange Page</a></li><listyle="color: #00F"><ahref="blue.html">The Blue Page</a></li><li><ahref="dummy.html">The Dummy Page</a></li></ul>
In the next section, we’re going to abandon this uncommitted
experiment. But since the git revert command requires a commit ID
to undo, we can’t use the method discussed above.
Undo Uncommitted Changes
Before we start undoing things, let’s take a look at the status of our repository.
gitstatus
We have a tracked file and an untracked file that need to be changed. First,
we’ll take care of index.html:
gitreset--hard
This changes all tracked files to match the most recent commit.
Note that the --hard flag is what actually updates the file.
Running git reset without any flags will simply unstage
index.html, leaving its contents as is. In either case, git
reset only operates on the working directory and the staging area, so
our git log history remains unchanged.
Next, let’s remove the dummy.html file. Of course, we
could manually delete it, but using Git to reset changes eliminates human
errors when working with several files in large teams. Run the following
command.
gitclean-f
This will remove all untracked files. With dummy.html
gone, git status should now tell us that we have a
“clean” working directory, meaning our project matches the most
recent commit.
Be careful with git reset and
git clean. Both operate on the working directory, not on the
committed snapshots. Unlike git revert, they
permanently undo changes, so make sure you really
want to trash what you’re working on before you use them.
Conclusion
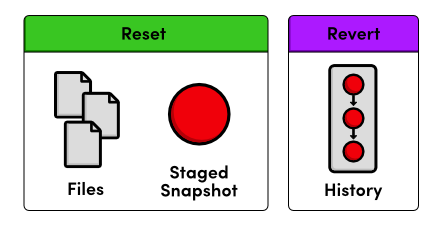
As noted in the previous module, most Git commands operate on one of the
three main components of a Git repository: the working directory, the staged
snapshot, or the committed snapshots. The git reset command undoes
changes to the working directory and the staged snapshot, while git
revert undoes changes contained in committed snapshots. Not
surprisingly, git status and git log directly
parallel this behavior.
I mentioned that instead of completely removing a commit, git
revert saves the commit in case you want to come back to it later. This
is only one reason for preserving committed snapshots. When we start working
with remote repositories, we’ll see that altering the history by removing
a commit has dramatic consequences for collaborating with other developers.
This module also introduces the concept of switching between various
commits and branches with git checkout. Branches round out our
discussion of the core Git components, and they offer an elegant option for
optimizing your development workflow. In the next module, we’ll cover
the basic Git branch commands.
Quick Reference
git checkout <commit-id>- View a previous commit.
git tag -a <tag-name> -m "<description>"- Create an annotated tag pointing to the most recent commit.
git revert <commit-id>- Undo the specified commit by applying a new commit.
git reset --hard- Reset tracked files to match the most recent commit.
git clean -f- Remove untracked files.
-
git reset --hard/git clean -f - Permanently undo uncommitted changes.