
Zeta File System
Cheat Sheet
Serge Y. Stroobandt
Copyright 2012–2022, licensed under Creative Commons BY-NC-SA
Why ZFS?
The data integrity problem can be best described as follows:1
System administrators may feel that because they store their data on a redundant disk array and maintain a well-designed tape-backup regimen, their data is adequately protected. However, undetected data corruption can occur between backup periods. Subsequently backing up corrupted data will yield corrupted data when restored.
The Zeta File System (ZFS) features the capability of being self validating and self healing from silent data corruption or data rot through continuous data block checksumming.2 Each block write operation yields a 256‑bit block checksum. The resulting block checksum is not stored with the block, but rather with its parent block.3 Hence, the blocks of a ZFS storage pool form a Merkle tree in which each block contains the checksum of all of its children.4 This allows the entire pool to continuously self validate its data with every operation on both accuracy and correctness, ensuring data integrity.
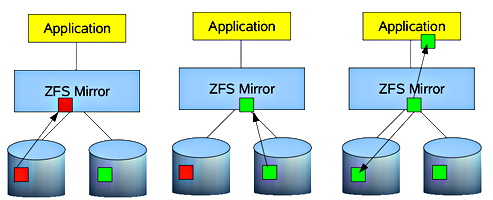
How ZFS self heals from silent data corruption or data rot through continuous block checksumming. Source: root.cz
ZFS design principles include:3
- Pooled storage
- No volumes
- Virtualizes all disks
- End-to-end data integrity
- Everything Copy-On-Write
- No overwrite of live data
- On-disk state always valid
- Everything is checksummed
- No silent data corruption possible
- No panics due to corrupted metadata
- Everything Copy-On-Write
- Everything transactional
- All changes occur together
- No need for journaling
- High-performance full stripe writes
ZFS server hardware
- To run ZFS, a server needs to meet a set of stringent hardware requirements. A separate article deals with this matter in detail.
- ZFS only runs on 64-bit kernels because it contains 64-bit specific code.
- With deduplication switched off, ZFS runs on surprisingly modest CPUs. Personally, I had ZFS running for several years on a 2010 vintage Intel Atom D510 processor, clocked down to a mere 1 GHz clock speed to save on the electricity bill.
- Install ZFS only on a system with lots of RAM. 1 GB is the bare minimum but 4 GB RAM would be preferred to start. I currently run 16 GB on my server, of which roughly ⅔ is used; half of this amount by ZFS’ own adaptive replacement cache (ARC).
- Use ECC RAM when possible for scrubbing data in registers and maintaining data consistency. The ARC is an actual read-only data cache of valuable data in RAM.
- ZFS will be not happy running on a system without a
swappartition.
Why Ubuntu LTS Server Edition?
I use ZFS on Ubuntu LTS Server Edition and Xubuntu LTS (the latter for making offline backups). Since the advent of Ubuntu 16.04 LTS, ZFS packages are provided in full support by the 64 bit distribution. As I am using Xubuntu LTS on the desktop, it is a small step to use Ubuntu LTS Server Edition. Packages are available under the same name and version number, which is really convenient. Being Debian based, the sheer amount of available packages will suit all needs and Ubuntu packages will be more recent than Debian.
I considered for a moment using CentOS for its ten years of support, compared to a mere five years with Ubuntu Server LTS releases. However, in a home or small office setting, one most probably expects a bit more from its server than just file serving on the local network. The CentOS repository is extremely rudimentary. Even for the most basic use cases, one grows dependent on third‑party repositories.
Neither are FreeBSD based distributions —like FreeNAS and NAS4Free— an option, because of their lack of support for UTF-8 character encoding. This might be fine in the Anglo-Saxon speaking part of the world, but certainly is not for the vast majority in the rest of the world. This can be fixed, but I really do not want to be dealing with something basic like this.
Installation

- The Lawrence Livermore National Laboratory has been working on porting the native Solaris ZFS source to the Linux kernel as a kernel module. Follow the installation instructions at zfsonlinux.org for your specific GNU/Linux distribution.
Checking the installed ZFS version number can be done as follows on Debian derived systems:
$ dpkg -l zfs*Virtual devices
A virtual device (VDEV) is a meta-device that can represent one or more devices. ZFS supports seven different types of VDEV.
- File - a pre-allocated file
- Physical Drive (HDD, SDD, PCIe NVME, etc)
- Mirror - a standard RAID1 mirror
- ZFS software raidz1, raidz2, raidz3 ‘distributed’ parity based RAID
- Hot Spare - hot spare for ZFS software raid.
- Cache - a device for level 2 adaptive read cache (ZFS L2ARC)
- Log - ZFS Intent Log (ZFS ZIL)
A device can be added to a VDEV, but cannot be removed from it. For most home or small office users, each VDEV usually corresponds to a single physical drive. During pool creation, several of these VDEVs are combined into forming a mirror or RAIDZ.
- Use whole disks rather than partitions. ZFS can make better use of the on-disk cache as a result. If you must use partitions, backup the partition table, and take care when reinstalling data into the other partitions, so you don’t corrupt the data in your pool.
- Do not mix disk sizes or speeds in VDEVs, nor storage pools. If VDEVs vary in size, ZFS will favor the larger VDEV, which could lead to performance bottlenecks.
- Do not create ZFS storage pools from files in other ZFS datasets. This will cause all sorts of headaches and problems.
Identifying physical devices
$ lsblk
    NAME   MAJ:MIN RM   SIZE RO TYPE MOUNTPOINT
    sdf           8:80   0   1.8T  0 disk

$ lsblk -o NAME,TYPE,SIZE,MODEL,SERIAL,WWN,MOUNTPOINT
    sdf         disk   1.8T WDC_WD20EFRX-68EUZN0    WD-WCC4M4DKAVF1 0x50014ee262c435af

$ ls -l /dev/disk/by-id/
    lrwxrwxrwx 1 root root  9 Aug 20 16:55 ata-WDC_WD20EFRX-68EUZN0_WD-WCC4M4DKAVF1 -> ../../sdf

$ ls -dl --color=always /dev/disk/by-id/* |sed s:^.*/dev:/dev:
    /dev/disk/by-id/ata-WDC_WD20EFRX-68EUZN0_WD-WCC4M4DKAVF1 -> ../../sdf
    …
    /dev/disk/by-id/wwn-0x50014ee262c435af -> ../../sdf
Life gets easier if you add improved command evocations as an alias to .bashrc_aliases:
alias hddtemp='sudo hddtemp /dev/sd*[^[:digit:]] 2>/dev/null |sort -k3rn'
alias lsblk='lsblk -o NAME,TYPE,SIZE,MODEL,SERIAL,WWN,MOUNTPOINT'
alias lsid='ls -dl --color=always /dev/disk/by-id/* |sed s:^.*/dev:/dev:'
Note that a drive or a drive partition can have more than one by-id. Apart from the ID based on the brand, model name and the serial number, there is also a wwn- ID. This is the unique World Wide Name (WWN) and is also printed on the drive case.
Both type of IDs work fine with ZFS, but the WWN is a bit less telling. If these WWN IDs are not referenced by the production system (e.g. a root partition or a ZFS that has not been exported yet), these may simply be removed with sudo rm wwn-*. Trust me; I have done that. Nothing can go wrong as long as the ZFS is in an exported state before doing this. After all, WWN IDs are mere symbolic links to sd devices that are created at drive detection. They will automatically reappear when the system is rebooted. Internally, Linux always references sd devices.
For the physical identification using storage enclosure LEDs, I created the following bash script:
#!/usr/bin/env bash

# https://serverfault.com/a/1108701/175321

if [[ $# -gt 0 ]]
then
    while true
    do
        dd if=$1 of=/dev/null >/dev/null 2>&1 || sudo dd if=$1 of=/dev/null >/dev/null 2>&1
        sleep 1
    done
else
    echo -e '\nThis command requires a /dev argument.\n'
fi
Unlike ledctl from the ledmon package, this script also works fine with non-Intel hard drive controllers.
Zpool creation
-
A zpool is a pool of storage made from a collection of VDEVs. One or more ZFS file systems can be created within a ZFS pool, as will be shown later. In practical examples, zpools are often given the names
pool,tankorbackup, preferably followed by a digit to designate between multiple pools on a system.
Single drive zpool
Single drive zpools are useful for receiving a backup from a redundant mirror or RAIDZ production server. Note that the lower-case -o option sets pool properties, whereas the upper-case -O is required to set file system properties. Certain options are recommended to be set at every instance of a zpool creation, even though these options are not set by default. These recommended options are explained below.
$ sudo zpool create -f -o ashift=12 -o autoexpand=on -O compression=on -O dedup=off backup0 /dev/disk/by-id/ata-WDC_WD20EFRX-68EUZN0_WD-WCC4M4DKAVF1

$ sudo zpool list
    NAME      SIZE  ALLOC   FREE  EXPANDSZ   FRAG    CAP  DEDUP  HEALTH  ALTROOT
    backup0  1.81T   300K  1.81T         -     0%     0%  1.00x  ONLINE  -
-o ashift=12
The zpool create property -o ashift can only be set at pool creation time. Its value corresponds to the base 2 logarithm of the pool sector size in kibibyte. I/O operations are aligned to boundaries specified by this size. The default value is 9, as \(2^9 = 512\), which corresponds to the standard sector size of operating system utilities used for both reading and writing data. In order to achieve maximum performance from Advanced Format drives with 4 KiB boundaries, the value should be set to ashift=12, as \(2^{12} = 4096\).
Here is a potential way of finding out the physical block size of your drives using the operating system. However, this method is not fail proof! Western Digital drives in particular may falsely report as being non-Advanced Format (see inset below). Anyhow, by installing hdparm, one can query the microprocessor on the printed circuit board of a hard drive. (Yes, hard drives are actually little computers on their own.)
$ sudo apt-get install hdparm
$ sudo hdparm -I /dev/sdb |grep Sector\ size:
    Logical  Sector size:                   512 bytes
    Physical Sector size:                  4096 bytes
Western Digital drives lie!!!
Advanced Format drives may emulate 512 byte physical sectors, but still use 4096 byte sectors underneath!
In 2010, the first drives featuring Advanced Format 4096 byte physical blocks appeared on the market. Initially, compatibility with older operating systems like Windows™ XP was an issue. Drive manufacturers maintained backwards compatibility by reporting physical block sizes of only 512 byte in utility commands such as
lsblk,blktooland occasionally evenhdparm -I. Nowadays, most new hard drives feature Advanced Format. However, Western Digital drives keep on lying about their physical block size in a world where this no longer necessary. Therefore, the only way of knowing for sure whether a drive is Advanced Format or not, is by looking up the specification sheet or perhaps reading the physical label on the drive. To achieve maximum performance with Advanced Format drives, specify-o ashift=12.
The label of a 2010 model
EARS1 TB Western Digital Green drive, featuring Advanced Format. Source: tomshardware.com
-o autoexpand=on
The pool property -o autoexpand=on must be set on before replacing a first drive in the pool with a larger sized one. The property controls automatic pool expansion. The default is off. After all drives in the pool have been replaced with larger drives, the pool will automatically grow to the new, larger drive size.
-O compression=on
Always enable compression. There is almost certainly no reason to keep it disabled. It hardly touches the CPU and hardly touches throughput to the drive, yet the benefits are amazing. Compression is disabled by default. This doesn’t make much sense with today’s hardware. ZFS compression is extremely cheap, extremely fast, and barely adds any latency to the reads and writes. In fact, in some scenarios, your disks will respond faster with compression enabled than disabled. A further benefit is the massive space benefits.
-O dedup=off
Even if you have the RAM for it, ZFS deduplication is, unfortunately, almost certainly a lose.5 So, by all means avoid using deduplication; even on a machine built to handle it. Unlike compression, deduplication is very costly on the system. The deduplication table consumes massive amounts of RAM.
-f
The force option -f forces the use of the stated VDEVs, even if these appear to be in use. Not all devices can be overridden in this manner.
Zpool mirror
$ cd /dev/disk/by-id/
$ ls
$ sudo zpool create -f -o ashift=12 -O compression=on -O dedup=off pool0 mirror scsi-SATA_WDC_WD10EARS-00_WD-WCAV56475795 scsi-SATA_WDC_WD10EARS-00_WD-WCAV56524564
In order to take advantage of ZFS self healing capabilities through constant checksumming (Figure 1), a ZFS storage server should have inherent redundancy offered by either mirroring or RAIDZ. Use redundancy when possible, as ZFS can and will want to correct data errors that exist in the pool. You cannot fix these errors if you do not have a redundant good copy elsewhere in the pool. Mirrors and RAID-Z levels accomplish this.
A mirrored storage pool configuration requires at least two disks, when possible, connected to separate controllers. Personally, I prefer running a three-way mirror using three disks, even though this consumes 50% more electric power. Here is the reason why. When one physical drive in a two-way mirror fails, the remaining drive needs to be replicated —resilvered in ZFS speak— to a new physical drive. Replication puts additional stress on a drive and it is not inconceivable that the remaining drive would fail during its replication process. “When it rains, it pours.” By contrast, a three-way mirror with one failed disk maintains 100% redundancy. A similar argument exists in favour of RAIDZ‑2 and RAIDZ‑3 over RAIDZ‑1.
Zpool RAIDZ
- https://www.openoid.net/zfs-you-should-use-mirror-vdevs-not-raidz/
- When considering performance, know that for sequential writes, mirrors will always outperform RAID-Z levels. For sequential reads, RAID-Z levels will perform more slowly than mirrors on smaller data blocks and faster on larger data blocks. For random reads and writes, mirrors and RAID-Z seem to perform in similar manners. Striped mirrors will outperform mirrors and RAID-Z in both sequential, and random reads and writes.
- Consider using RAIDZ-2 or RAIDZ-3 over RAIDZ-1. You’ve heard the phrase “when it rains, it pours”. This is true for disk failures. If a disk fails in a RAIDZ-1, and the hot spare is getting resilvered, until the data is fully copied, you cannot afford another disk failure during the resilver, or you will suffer data loss. With RAIDZ-2, you can suffer two disk failures, instead of one, increasing the probability you have fully resilvered the necessary data before the second, and even third disk fails.
Export & import zpools
Exporting zpools
Storage pools should be explicitly exported to indicate that these are ready to be migrated. This operation flushes any unwritten data to disk, writes data to the disk indicating that the export was done, and removes all information about the zpool from the system.
If a zpool is not explicitly exported, but instead physically removed, the resulting pool can nonetheless still be imported on another system. However, the last few seconds of data transactions may be lost. Moreover, the pool will appear faulted on the original system because the devices are no longer present. By default, the destination system cannot import a pool that has not been explicitly exported. This condition is necessary to prevent from accidentally importing an active zpool consisting of network attached storage and that is still used by another system.
Always export your storage pool!
before physically detaching the storage devices from the system.
With the command:
~# zpool export pool0Failure to do so, may result in a failure of automatic zpool mounting. Should this nonetheless occur, the storage pool can be reimported manually with the following command:
~# zpool import -d /dev/disk/by-id/ pool0It is no longer necessary to export a zpool before performing a
do-releases-upgrade. Since release 16.04, Ubuntu now carries the ZFS packages in the standard repository.However, if
/homeis on a zpool, make sure to set arootpassword with$ sudo passwd root, prior to performing a release upgrade. This way, you will still be able to log in to your system asroot, should an issue arrise with mounting/home.
Importing all zpools
To import all known storage pools, simply type:
~# zpool import -aImporting zpools by name is also possible.
Drive referencing by‑id
Here is how to convert a zpool with /dev/sdx designated devices to devices designated by /dev/disk/by-id/.
~# zpool export pool0
~# zpool import -d /dev/disk/by-id/ pool0
Note that a drive or a drive partition can have more than one by-id. Apart from the ID based on the brand, model name and the serial number, nowadays there might also be a wwn- ID. This is the unique World Wide Name (WWN) and is also printed on the drive case.
Both type of IDs work fine with ZFS, but the WWN is a bit less telling. If these WWN IDs are not referenced by the production system (e.g. a root partition or a ZFS that has not been exported yet), these may simply be removed with sudo rm wwn-*. Trust me; I have done that. Nothing can go wrong as long as the ZFS is in an exported state before doing this. After all, WWN IDs are mere symbolic links to sd devices that are created at drive detection. They will automatically reappear when the system is rebooted. Internally, Linux always references sd devices.
~# zpool export pool0
~# rm wwn-*
~# zpool import -d /dev/disk/by-id/ pool0
Renaming a zpool
Here is an example where a zpool called tank0 is renamed to pool0.
~# zpool export tank0
~# zpool import tank0 pool0
~# zpool list
Upgrading the zpool version
Occasionally, a zpool status report may yield a message similar to this:
$ sudo zpool status
      pool: pool0
     state: ONLINE
    status: Some supported features are not enabled on the pool. The pool can
        still be used, but some features are unavailable.
    action: Enable all features using 'zpool upgrade'. Once this is done,
        the pool may no longer be accessible by software that does not support
        the features. See zpool-features(5) for details.
      scan: none requested
All -a zpools can easily be upgraded while being online.
Only proceed to a zpool upgrade when having ensured that all servers and backup servers that require access to these zpools are running the same version of ZFS.
$ zpool --version
    zfs-0.8.3-1ubuntu12.14
    zfs-kmod-0.8.3-1ubuntu12.14
$ sudo zpool upgrade -a
ZFS file systems
ZFS file system creation
One or more Zeta file systems can live on a zpool. Here are a number of points to take into account:
Turning access time writing off with -o atime=off can result in significant performance gains. However, doing so might confuse legacy mail clients and similar utilities.
$ sudo zfs create -o atime=off pool0/home- Avoid running a ZFS root file system on GNU/Linux for the time being. It is currently a bit too experimental for
/bootand GRUB. - However, do create file systems for
/homeand, if desired,/var/logand/var/cache. - For
/homeZFS installations, set up nested file systems for each user. For example,pool0/home/atoponceandpool0/home/dobbs. Consider using quotas on these file systems. - Further implications of creating a
/homefile system are described in the next subsection.
ZFS as /home
If
/homeis on a zpool, make sure to set arootpassword with$ sudo passwd root, prior to performing a release upgrade. This way, you will still be able to log in to your system asroot, should an issue arrise with mounting/home.
Mounting as /home
Here is how to mount a ZFS file system as home:
$ sudo zfs set mountpoint=/home pool0/homeUnmounting /home
Certain Zeta pool and file system operations require prior unmounting of the file system. However, the /home Zeta file system will refuse to unmount because it is in use:
~# zpool export pool0

    umount: /home: target is busy
            (In some cases useful info about processes that
             use the device is found by lsof(8) or fuser(1).)
    cannot unmount '/home': umount failed
This conundrum can be overcome by logging in as root with physical access to a real text terminal on the server. There is really no other way. On Ubuntu, this involves assigning a root password in a safe way.
- Physical access to the server will be required.
- Before assigning a password to root, security reasons require setting both
PermitRootLogintonoandPasswordAuthenticationtonoin the/etc/ssh/sshd_configconfiguration file. Afterwards, these settings should be left like that. Here are a couple of Ansible tasks to take care of these settings:
---
- name: 'PermitRootLogin no'
  lineinfile:
    path: /etc/ssh/sshd_config
    regexp: '^PermitRootLogin '
    line: 'PermitRootLogin no'    # Was: PermitRootLogin prohibit-password
  notify: restart ssh

- name: 'PasswordAuthentication no'
  lineinfile:
    path: /etc/ssh/sshd_config
    regexp: '^PasswordAuthentication '
    line: 'PasswordAuthentication no'
  notify: restart ssh

- meta: flush_handlers
The corresponding Ansible handler is:
---
- name: 'restart ssh'
service: name=ssh state=restarted- Since Ubuntu is being used, and if a root password was not defined yet, one should do so now using
$ sudo passwd root. There really is no other way. - In
/etc/dhcp/dhclient.conf, settimeoutto15. Otherwise, the next step will cause the boot time to increase with 5 minutes (300 seconds)!
---
- name: 'Lower DHCP timeout to 15s.'
  lineinfile:
    path: /etc/dhcp/dhclient.conf
    regexp: '^timeout'
line: 'timeout 15' # Was: timeout 300- Reboot with the 8P8C Ethernet plug physically disconnected from the RJ45 jack. This will ensure no other users are accessing the
/homefile system. - Open a real text console with Ctrl+Alt+F1.
- Immediately log in as
root. - Kill any X window manager services
~# service lightdm stop - List any open files
~# lsof |grep homeon/homeand kill any pertaining processes when necessary. - Cautiously perform the exporting or mount point setting.
- Switch to your normal user name as soon as possible for any other tasks. This adds a level of fool proof safety to any shell commands.
Scrubbing

- Scrubbing examines all data to discover hardware faults or disk failures, whereas resilvering examines only that data known to be out of date. Scrubbing ZFS storage pools now happens automatically. It can also be intiated manually. If possible, scrub consumer-grade SATA and SCSI disks weekly and enterprise-grade SAS and FC disks monthly.
$ sudo zpool scrub pool0Monitoring

- In order to preserve maximum performance, it is essential to keep pool allocation under 80% of its full capacity. The following set of monitoring commands help to keep an eye on this and other aspects of zpool health.
For example, the file system may get heavily fragmented due to the copy-on-write nature of ZFS. It might be useful to e-mail capacity reports monthly.
$ zpool list
    NAME    SIZE  ALLOC   FREE  EXPANDSZ   FRAG    CAP  DEDUP  HEALTH  ALTROOT
    pool0   928G   475G   453G         -     4%    51%  1.00x  ONLINE  -

$ zfs list
    NAME         USED  AVAIL  REFER  MOUNTPOINT
    pool0        475G   424G   136K  /pool0
    pool0/home   475G   424G   450G  legacy

$ zfs list -t snapshot
    NAME                   USED  AVAIL  REFER  MOUNTPOINT
    pool0/home@20120722   1.35M      -   373G  -
    …
    pool0/home@20160701   31.7M      -   450G  -
    pool0/home@20160706   12.1M      -   450G  -
    pool0/home@20160707    124K      -   450G  -
Use the zpool status command for status monitoring. Options are available for verbose output or an automatic repeat after, for example, every five seconds. Consult the Oracle Solaris documentation for details about zpool status output. The second command line is a remote server example.
$ zpool status -v 5
$ ssh -t servername 'sudo zpool status -v 5'
Input/output monitoring, verbose for individual VDEVs, repeated every five seconds:
$ zpool iostat -v 5Especially in new hardware builds, it is cautious to check the temperature of all hard drives.
$ sudo hddtemp /dev/sd*[^[:digit:]] 2>/dev/null |sort -k3rn
    /dev/sda: Generic MassStorageClass: S.M.A.R.T. not available
    /dev/sde: WDC WD20EFRX-68EUZN0: 35°C
    /dev/sdf: WDC WD20EFRX-68EUZN0: 34°C
    /dev/sdg: WDC WD20EFRX-68EUZN0: 36°C
This hddtemp evocation can be made the default by adding the following line to .bash_aliases:
alias hddtemp='sudo hddtemp /dev/sd*[^[:digit:]] 2>/dev/null |sort -k3rn'Snapshots
Snapshot creation

-
Snapshot Zeta file systems frequently and regularly. Snapshots are cheap, and can keep a plethora of file versions over time. Consider using something like the
zfs-auto-snapshotscript.
$ sudo zfs snapshot pool0/home@20120722
$ zfs list -t snapshot
To see the snapshot creation time, add the following zfs list options:
$ zfs list -t snapshot -o name,used,refer,creation
    NAME                   USED  REFER  CREATION
    pool0/home@20120722   1.35M   373G  Sun Jul 22 12:22 2012
Accessing snapshots
Snapshots of file systems are accessible through the .zfs/snapshot/ directory within the root of the containing file system. Here, the root of the file system is mounted as /home.
cd /home/.zfs/snapshot/20120722Snapshots are not a backup; only snapshots replicated on a detached external storage device are. Snapshots merely serve to recuperate files or earlier versions of files that were not under version control.
Renaming snapshots
$ sudo zfs rename pool0/home@2021070 pool0/home@2021070.badDestroying snapshots
After a year or so, snapshots may start to take up some disk space. Individual snapshots can be destroyed as follows after listing. This has no consequences for the validity of other snapshots.
$ zfs list -t snapshot
$ sudo zfs destroy pool0/home@20120722
Snapshots can also be destroyed in sequences. For this to work, the range must consists of two snapshots that actually do exist. It will not work with arbitrary date ranges.
$ zfs list -t snapshot
$ sudo zfs destroy pool0/home@20120722%20160713
Automated snapshots
To automate periodic snapshots, Sanoid is probably your best shot (pun intended). Apart from facilitating automated snapshot, Sanoid also offers essential infrastructure to simplify the backup process (see next section). The sanoid package is available from Ubuntu’s standard repository.
$ sudo apt install sanoid
$ sudo nano /etc/sanoid/sanoid.conf
A simple example example for the contents of /etc/sanoid/sanoid.conf is shown below. For more detailed information, please refer to the Sanoid wiki. Even more options are described in /etc/sanoid/sanoid.defaults.conf
[pool0/home]
    frequently = 0
    hourly = 0
    daily = 30
    monthly = 12
    yearly = 3
    autosnap = yes
    autoprune = yes
On Ubuntu, the pre-installed sanoid.timer will automatically take it from there, creating pool0/home@autosnap_… snapshots.
Backups
“Consider data as intrinsically lost, unless a tested, offline, off‑site backup is available.”
Local backup
Snapshots are not a backup; only snapshots replicated on a detached external storage device are. Snapshots merely serve to recuperate files or earlier versions of files that were not under version control.
For all backup activities, the use of Syncoid is strongly recommended. Syncoid is an open-source replication tool, part of the sanoid package and written by the IT consultant Jim Salter. The syncoid command tremendously facilitates the asynchronous incremental replication of ZFS file systems, both local and remote over SSH. Syncoid is, so to speak, the cherry on top of the ZFS cake.
The backup process will take some time. Therefore, start a screen session once logged in on the server. It is important to note that the syncoid command will by default start with taking a snapshot of the ZFS file system.
Also, note that syncoid replicates ZFS file systems. To replicate an entire zpool, the -r or --recursive command option is required:
$ sudo apt install sanoid
$ screen -S bup
$ sudo zfs list
$ sudo syncoid -r pool0 backup0
$ sudo zpool export backup0
Do not forget to export the backup zpool before physically detaching the backup drives!
Chained backups
A chained backup process occurs, for example, when a server zpool is replicated to a detachable drive, which in turn is replicated on another system.
By default, Syncoid takes a snapshot prior to starting the replication process. This behaviour is undesired for chained backups. In above example, that would create, unbeknownst to the server, an unnecessary extra snapshot on the detachable drive.
To counter this default snapshot behaviour, issue the syncoid command for the second backup in the chain as follows:
$ sudo syncoid -r --no-sync-snap backup0 backup1Remote backup
Perform regular (at least weekly) backups of the full storage pool.
“Consider data as intrinsically lost, unless a tested, offline, off-site backup is available.”
A backup consists of multiple copies. Having only redundant disks, does not suffice to guarantee data preservation in the event of a power failure, hardware failure, disconnected cables, fire, a hacker ransom attack or a natural disaster.
Delegating receive permissions on the backup client
Delegation of permissions through
zfs allowandzfs unallowis available on ZFSonLinux only since version 0.7.0. Even then, some limitations apply.
sudo zfs allow desktop_user create,mount,receive backup0Delegated permissions on the backup client can be checked with:
$ sudo zfs allow backup0
---- Permissions on backup0 ------------------------------------------
Local+Descendent permissions:
user serge create,mount,receiveRemote backup with Syncoid
TODO
sudo syncoid --no-privilege-elevation --compress=none --sshkey=~serge/.ssh/id_rsa pool0 serge@mombot:backup0Mounting a backup
A backup drive will attempt to mount at the same point as its original. This results in a error similar to:
`cannot mount '/home': directory is not empty`.Changing the mountpoint for the backup resolves this issue. The backup zpool will need to be exported and imported again for this mountpoint change to take effect.
$ sudo zfs set mountpoint=/backup0/home backup0/home
$ sudo zpool export backup0
$ sudo zpool import backup0
Older snapshots of file systems on the backup drive are accessible through the .zfs/snapshot/ directory within the root of the containing file system.
cd /backup0/.zfs/snapshot/home/20170803Splitting off a backup
It is possible to split off a drive or virtual device as a stand-alone backup zpool:
$ sudo zpool split pool0 backup0 /dev/disk/by-id/scsi-SATA_WDC_WD10EADS-00_WD-WCAV51264701It looks tempting to later update such a backup using resilvering. However, I strongly advise against this practice. Doing so leads to problems further down the road.
SFTP server
Workstations use the SSHFS (Secure Shell Filesystem) client to access server files through SFTP (Secure Shell File Transfer Protocol).
- Complete file permission transparency is the main reason for preferring SFTP over the Windows™ style Server Message Block (SMB). This, despite the fact that ZFS has been integrated with the GNU/Linux implementation, called Samba.
- Furthermore, SFTP handles well changing the case of filenames. This cannot be said about the latest Samba versions!
- SFTP significantly simplifies things. If the server is accessible over SSH, SSHFS should also work.
- Running only an OpenSSH SFTP server significantly reduces exposure as SFTP is inherently more secure than SMB and NFS.
- Eavesdropping on the (W)LAN is not an issue, since all file transfers are encrypted.
- The only drawback are the slower file transfer speeds due to the encryption overhead.
SSHFS clients
Here is the bash script that I wrote to mount the server through SSHFS on any client computer. It gets executed at login, in my case by specifying the script in Xubuntu’s Session and Startup → Application Autostart. However, the script can also be run manually, for example after connecting to a mobile network.
The optimisation parameters are from the following article and tests. As a requisite, the administrator needs to create a /$server/$USER mount point directory for every user on the client system.
# !/usr/bin/env bash

mountpoint="/$server/$USER"

options=' -o reconnect -o cache=yes -o kernel_cache -o compression=yes -o large_read'
options+=" -o idmap=file -o uidfile=$HOME/.uidfile -o gidfile=$HOME/.gidfile -o nomap=ignore"

{ sshfs $server:/home $mountpoint -p 22 $options > /dev/null 2>&1 && echo -e '\nThe server is now mounted over LAN.\n'; } || \
{ sshfs $roam:/home $mountpoint -p 443 $options && echo -e '\nThe server is now mounted over WAN.\n'; }
Drive attach & detach
Attaching more drives
Before adding more drives to a zpool, it might be a good idea to scrub the zpool first.
Doing so, will limit the resilvering process to a single drive. If the resilvering process does not run smoothly (e.g. slow data rate and/or endless restarting), the drive to blame will be known. Should this happen, simply detach the faulty drive and dispose of it in an environmentally friendly way.
The command zpool attach is used to attach an extra drive to an existing drive in a zpool as follows:
$ sudo zpool attach [-f] [-o property=value] <pool> <existing-device> <new-device>It may seem a bit superfluous having to specify an existing device in addition to the zpool name when adding a new device. However, this has all to do with the fact that one is also offered the possibility to add a new device to a virtual device.
$ cd /dev/disk/by-id/
$ ls -l
$ sudo zpool status

$ sudo zpool attach pool0 scsi-SATA_WDC_WD10EADS-00_WD-WCAV51264701 scsi-SATA_WDC_WD10EARS-00_WD-WCAV56524564
$ sudo zpool status 5
The last line is to monitor the resilvering process. If zpool attach is complaining about the new drive being in use, and you know what you are doing, simply add -f to force zpool attach into what you want it to do.
$ sudo zpool attach -f pool0 scsi-SATA_WDC_WD10EADS-00_WD-WCAU4D512265 scsi-SATA_WDC_WD10EARS-00_WD-WCAV56475795Replacing a failing drive
$ sudo zpool status
      pool: pool0
     state: ONLINE
    status: One or more devices has experienced an unrecoverable error.  An
        attempt was made to correct the error.  Applications are unaffected.
    action: Determine if the device needs to be replaced, and clear the errors
        using 'zpool clear' or replace the device with 'zpool replace'.
       see: https://zfsonlinux.org/msg/ZFS-8000-9P
      scan: scrub repaired 28K in 6h58m with 0 errors on Sun Aug 14 07:22:34 2022
    config:

        NAME                                         STATE     READ WRITE CKSUM
        pool0                                        ONLINE       0     0     0
          mirror-0                                   ONLINE       0     0     0
            ata-WDC_WD10EARS-00Y5B1_WD-WCAV56524564  ONLINE       0     0    19
            ata-WDC_WD10EADS-00M2B0_WD-WCAV51264701  ONLINE       0     0     0
            ata-WDC_WD10EADS-00L5B1_WD-WCAU4D512265  ONLINE       0     0     0

$ sudo zpool replace pool0 ata-WDC_WD10EARS-00Y5B1_WD-WCAV56524564
The zpool replace command comes very handy when a failed or failing drive of a redundant zpool needs to be replaced with a new drive in exactly the same physical drive bay. It suffices to identify the drive that needs to be replaced. ZFS will automatically detect the new drive and start the resilvering process.
Detaching a drive
$ zpool status
$ sudo zpool detach pool0 ata-WDC_WD10EARS-00Y5B1_WD-WCAV56524564
Troubleshooting
When failing to create a zpool
I once ran into a case where zpool creation by-id did not work. Using the sdx device name did work, however. Exporting and reimporting the pool by-id kept everything nice and neat.
$ sudo zpool create -f -o ashift=12 -o autoexpand=on -O compression=on -O dedup=off backup0 /dev/disk/by-id/ata-WDC_WD20EFRX-68EUZN0_WD-WCC4M4DKAVF1
$ sudo zpool create -f -o ashift=12 -o autoexpand=on -O compression=on -O dedup=off backup0 /dev/sdx
$ sudo zpool export backup0
$ sudo zpool import -d /dev/disk/by-id/ backup0
When a drive refuses to attach
Running a consistency check through the command zdb may cure a drive from not attaching.
$ sudo zdb
$ sudo zpool attach pool0 15687870673060007972 /dev/disk/by-id/scsi-SATA_WDC_WD10EADS-00_WD-WCAV51264701
Destroying a zpool
ZFS pools are virtually indestructible. If a zpool does not show up immediately, do not presume too quickly the pool to be dead. In my experience, digging around a bit will bring the pool back to life. Do not unnecessarily destroy a zpool!
$ sudo zpool destroy tank1Other cheat sheets
- https://www.csparks.com/ZFS%20Without%20Tears.html
- https://pthree.org/2012/04/17/install-zfs-on-debian-gnulinux/
- https://wiki.ubuntu.com/Kernel/Reference/ZFS
- http://www.datadisk.co.uk/html_docs/sun/sun_zfs_cs.htm
- https://lildude.co.uk/zfs-cheatsheet
- https://louwrentius.com/71-tib-diy-nas-based-on-zfs-on-linux.html
- https://arstechnica.com/information-technology/2014/02/ars-walkthrough-using-the-zfs-next-gen-filesystem-on-linux/1/
Real-world example
Here is a real-world ZFS example by Jim Salter of service provider Openoid, involving reshuffling pool storage on the fly.
References

This work is licensed under a Creative Commons Attribution‑NonCommercial‑ShareAlike 4.0 International License.
Other licensing available on request.

Unless otherwise stated, all originally authored software on this site is licensed under the terms of GNU GPL version 3.
This static web site has no backend database.
Hence, no personal data is collected and GDPR compliance is met.
Moreover, this domain does not set any first party cookies.
All Google ads shown on this web site are, irrespective of your location,
restricted in data processing to meet compliance with the CCPA and GDPR.
However, Google AdSense may set third party cookies for traffic analysis and
use JavaScript to obtain a unique set of browser data.
Your browser can be configured to block third party cookies.
Furthermore, installing an ad blocker like EFF's Privacy Badger
will block the JavaScript of ads.
Google's ad policies can be found here.
transcoded by


 .
.

