
Same PC, New HD
Serge Y. Stroobandt
Copyright 2016–2021, licensed under Creative Commons BY-NC-SA
Introduction
- Here are my notes about how to change the system hard disk of a GNU/Linux computer, without the need for reinstalling the operating system(s). This comes handy when upgrading from a «spinning rust» boot drive to a much quicker solid-state drive (SSD).
Required hardware
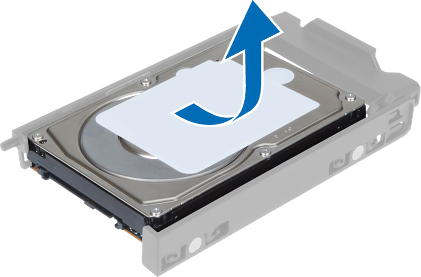
- With the PC powered down, install and connect the new hard drive. For the time being, the old hard drive remains in place to allow the copying of its partitions to the new drive. When dealing with a laptop computer, or when only one hard drive bay or SATA port is available, use a SATA to USB adaptor to temporarily connect the new hard drive to the PC. Beware that some drives may not work with such a simple adapter.
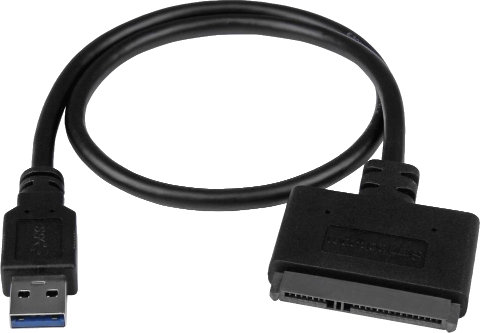
SATA to USB 3 adapter
Another useful piece of kit is a USB connected hard drive docking and cloning station, such as the one pictured below. Be careful with placing the old and new drives into the correct corresponding source and destination ports if you chose to clone. Mounting the drives over USB is preferred though, as it gives more control over the partitions. This also allows for an unrelated PC to perform all copying tasks, hence eliminating the need for a live CD/DVD or USB (see below). Most USB 3 devices are backwards compatible with USB 2.
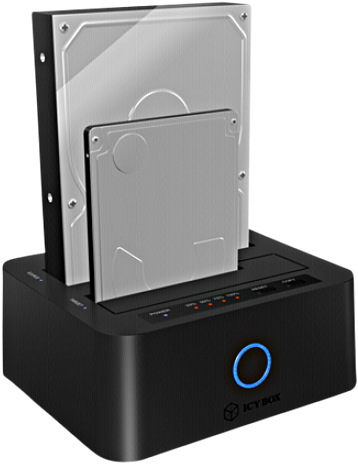
Icy Box IB-123CL-U3 USB 3 connected HD docking and cloning station
Use a live CD/DVD or USB

- Instead of immediately meddling with
chroot, one may opt for the more straightforward technique of booting from either a live CD/DVD or a live USB. The small bootable GParted Live distribution on CD/USB is an excellent choice for the task ahead. Tuxboot simplifies installing this tiny distro on a USB thumb drive. Note that some USB thumb drives and/or motherboards do not lend themselves to USB booting. Using a different USB drive or changing a setting in the BIOS might do the trick.
At start-up, you will have to instruct your computer’s BIOS or (more modern) UEFI to boot from the live DVD or USB instead of any HD. The BIOS can be accessed by hitting a specific key during start‑up. Which key, is posted briefly during the boot sequence. It differs from computer to computer. Your BIOS or UEFI may be protected by a password.
There may be one caveat with using the GParted Live distribution: SSD partitions created with its more recent versions of the Linux kernel and GParted may not be readable by older Linux kernels. In such circumstances, try to use the live medium of the old distribution to create the new SSD partitions.
GParted copy party
Creating a partition table
With a brand new hard drive, chances are it will come without any partition table. There happen to be two popular choices for the partition table format:
- Either a 1983‑era MS‑DOS style Master Boot Record (MBR),
- Or a more modern GUID Partition Table (GPT), requiring an additional BIOS partition when not using UEFI.
Obviously, GPT offers many advantages over MBR. If you want to boot in UEFI‑mode, it is even your only choice. However, if you plan to dual boot with Windows™ or when using an older BIOS without GPT support, you are basically stuck to MBR. Moreover, MBR does not require an additional BIOS partition when not using UEFI. Speed wise there is no difference between both technologies. When decided, proceed with GParted to Device → Create Partition Table….
There is no need to manually create partitions on the new drive. These will be copied from the old drive in the next step.
Resize partitions before copying to a smaller hard drive
Partitions copied to the new drive can be made bigger, but not smaller. If you are copying partitions to a smaller sized SSD, you will need to reduce the existing partions on the old drive first. This can be done using GParted.
Copying partitions with GParted
- With the live session running, carefully identify the old and new hard drive by their device names using the
lsblkcommand. Here we have to do with a «spinning rust» hard disk with seperate/bootandswappartitions.
$ sudo apt install util-linux
$ lsblk
NAME   MAJ:MIN RM   SIZE RO TYPE MOUNTPOINT
sda      8:0    0 279.5G  0 disk
├─sda1   8:1    0     1K  0 part
├─sda5   8:5    0   512M  0 part /boot
├─sda6   8:6    0   4.5G  0 part [SWAP]
├─sda7   8:7    0    64G  0 part /
└─sda8   8:8    0 210.5G  0 part /home
sdb      8:80   0 298.1G  0 disk
sr0     11:0    1  1024M  0 rom
From the Settings menu, launch GParted. The cool thing about GParted is that it allows for copying partitions from one drive to another. This works for all kinds of partitions, except for the [SWAP] partition which will be in use by the live session.
Creating /boot… or not
If the new hard drive is a solid state drive (SSD), there is absolutely no gain with copying the old /boot partition as a separate partition to the SSD. Copy rather the root / partition, then mount both the old /boot and the new root / drive partitions and copy all files from the old /boot partition to a new /boot directory on the new root / partition. Do not forget to mark the new root / partition as bootable using GParted.
$ cd /mnt
$ sudo mkdir /mnt/oldboot
$ sudo mount -o ro /dev/sda1 /mnt/oldboot
$ sudo mkdir /mnt/newroot
$ sudo mount /dev/sdb1 /mnt/newroot
$ sudo cp -a /mnt/oldboot/* /mnt/newroot/boot/
The line containing /boot in /etc/fstab needs to be deleted:
Creating swap… or not
No worries, the current swap contains nothing of any importance to us, anyhow. Hence, this leaves us now with two options:
- Either use GParted to create an equally sized
swapfile system on the new hard disk, which is easy enough, - Or, skip the creation of a
swappartition all together.
That latter option calls for a brief explanation. All depends on the underlying hardware:
- On a laptop that should be able to hibernate, create a
swappartition slightly larger than the available RAM. - On a desktop computer with an ordinary «spinning rust» hard disk, it does not harm to create a
swappartition; especially if you plan to do memory intensive jobs like video editing. - On a desktop computer with a new solid-state drive (SSD), it is better not to create any
swappartition. Anyswappartition would wear the SSD with frequent writes, eventually reducing the life span of the SSD for no good reason.
Starting with Ubuntu 17.04, a /swapfile will automatically be created on demand when no swap partition is present.
If you chose to delete a
swappartition, do not forget to edit/etc/fstabandRESUMEfor increased boot speed. See instructions below.
Listing the new situation
After copying the partitions with GParted Live distribution, reboot still from the old drive and use lsblk to list all block devices. The list may look similar to the one below. Note: On the old sda drive, I had implemented logical volume management (LVM); on the new sdb drive I chose not to do so any more. Such matters are of course not important.
$ lsblk
NAME   MAJ:MIN RM   SIZE RO TYPE MOUNTPOINT
sda      8:0    0 279.5G  0 disk
├─sda1   8:1    0     1K  0 part
├─sda5   8:5    0   512M  0 part /boot
├─sda6   8:6    0   4.5G  0 part [SWAP]
├─sda7   8:7    0    64G  0 part /
└─sda8   8:8    0 210.5G  0 part /home
sdb      8:80   0 298.1G  0 disk
├─sdb1   8:81   0   512M  0 part /boot
├─sdb2   8:82   0   4.5G  0 part
├─sdb3   8:83   0    44G  0 part /
└─sdb4   8:84   0 249.1G  0 part /home
sr0     11:0    1  1024M  0 rom
Reinstalling GRUB
With all the partitions are copied, and again running from the old drive, open a terminal and perform the following steps:
- Create a temporary mount point directory:
- Use this temporary mount point to mount the partition containing the root file system
/. If Logical Volume Management (LVM) is being used, follow these LVM mounting instructions.
- If a separate
/bootpartition is going to be used, mount it at/mnt/newroot/boot:
This step will fail with an error should remains of another previous file system be present on a recuperated drive. Should this is the case, wipe these remains with:
- Prepare the root environment by binding the current devices, processes and system to the respective directories in the new root environment:
$ sudo mount --bind /dev /mnt/newroot/dev
$ sudo mount --bind /proc /mnt/newroot/proc
$ sudo mount --bind /sys /mnt/newroot/sys- Change the root environment.
The prompt will change now to /#.
If partitions were only copied, there is no immediate need to edit
/etc/fstab. However, if a new partition was created to substitute an old one, editing/etc/fstabwill be necessary. See instructions below.Reinstall GRUB 2 on the new boot drive. Note that the device name is used and not the partition name.
- Update GRUB with the new information of
/etc/fstab
- Exit the
chrootenvironment:
- The computer may now be rebooted from the new hard drive. Again, you might have to instruct your BIOS/UEFI to choose the right boot device. If everything works fine, the temporary mount directories under
/mntmay be deleted usingsudo rmdir.
If a
grub>command line prompt «welcomes» you at boot time, then follow Carla Schröder’s excellent GRUB 2 rescue tutorial to boot from GRUB and make these changes permanent. In the end, everything will be fine.
One might also be «welcomed» by a more hostile
GRUB _message, without any command line prompt waiting for you. This seems to be inevitable when reinstalling GRUB using a second, unrelated machine. If this happens, make sure the new drive is mounted in the machine where it destined to boot. On a working computer, install theunetbootinpackage and download the Boot-Repair ISO file. Grab a bootable USB stick —not all are!— and create a Boot-Repair live USB drive. Boot the affected computer from this live USB drive by selecting it from the BIOS/UEFI menu, accessible with a special key when the POST messages appear. Follow the Boot-Repair instructions. Apart from having GRUB installed, your drive should also have a master boot record (MBR). It also helps when the boot partition was marked as bootable, earlier using GParted.
Despite these explanations, uncertainty may remain about why a certain partition will not boot. For such occasions, the Boot Info Script may bring invaluable information.
Edit /etc/fstab for SSD durability
The durability of SSD drives can be extended by reducing the number of unnecessary writes, such as the access time of files. This can be specified in the /etc/fstab file system table by adding the option noatime to each SSD partition line. Please, note: No space is allowed after the comma in front of noatime.
# <file system>                            <mount point>   <type>  <options>                  <dump>  <pass>
UUID=0b40e443-8c3e-4fa4-97ad-df261fe8ecc2  /               ext4    errors=remount-ro,noatime  0       1
UUID=24f92f23-a575-4921-9753-32bfa243318d  /home           ext4    defaults,noatime           0       2
# Because the system drive is an SSD:
#   - no swap nor /boot partition is employed,
#   - whereas 'noatime' is specified for all SSD partitions.
Edit /etc/fstab for boot speed
After completing all of the above, you reboot your computer … only to discover that the start-up sequence of your computer is taking much longer than it used to be! What is happening? Remember the swap partition that was either deleted or recreated a little while ago? This caused the system to waste boot time trying to locate a swap partition by looking for a Universally Unique Identifier (UUID) that no longer exists. As a matter of fact, hitting the F1 key while the start-up splash is shown on screen, will reveal the following message:
A start job is running for dev-disk-by … 1min30The remedy lies in editing the file system table /etc/fstab:
- If no
swappartition is used any more, simply delete the line infstabcontaining the wordswap. - Should a new
swappartition have been created, replace theswapUUID with the UUID of the newswappartition.
The blkid command provides a convenient way to obtain the UUID of the newly created swap partition. The blkid command comes with the util‑linux package.
$ sudo apt install util-linux
$ sudo blkid /dev/sda2
/dev/sda2: UUID="438b7a73-11c5-466c-b795-fcf6d0997056" TYPE="swap" PARTUUID="00035ac0-02"
There remains also the «old-school» method for obtaining the UUIDs of all disk partitions:
$ ls -l /dev/disk/by-uuid
total 0
lrwxrwxrwx 1 root root 10 Sep  1 13:08 438b7a73-11c5-466c-b795-fcf6d0997056 -> ../../sda2
lrwxrwxrwx 1 root root 10 Sep  1 13:08 7c581345-6850-44df-a387-cdf62cb09bba -> ../../sda4
lrwxrwxrwx 1 root root 10 Sep  1 13:08 8ef04775-ec47-4663-bc77-7e6f8980e195 -> ../../sda3
lrwxrwxrwx 1 root root 10 Sep  1 13:08 9b5c2cd5-43de-4a56-9da9-741710d28dc3 -> ../../sda1
With the file system table /etc/fstab properly sorted, you are now ready to enjoy your new drive at its full potential!
Edit RESUME for boot speed
If a swap partition is deleted, the file /etc/initramfs-tools/conf.d/resume should be either completely empty or read RESUME=. Delete any UUID number. RESUME=NONE is not valid.
The initial RAM filesystem requires updating for these changes to take effect:
Check logs for boot speed
Getting rid of a FlexNet warning
Occasionally, GRUB may reinstall on a used drive, but not without issuing the following warning:
/usr/sbin/grub-install:
warning: Sector 32 is already in use by the program `FlexNet`; avoiding it.
This software may cause boot or other problems in future.
Please ask its authors not to store data in the boot track.
On the Internet, you are never alone dealing with such issue. In my case, the replacement drive happened to be a repurposed drive that previously held commercially licensed software under Microsoft Windows™. FlexNet appears to be a digital contraption that keeps record of one’s licenses by writing data to a sector in the extended boot record (EBR). This is certainly not the kind of digital parasite we would like to see living in our extended boot record!
Removing FlexNet
Still within the same live DVD/USB session or in a new one, remove FlexNet from the affected drive (here /dev/sdb), using the sector number reported by GRUB (here sector 32):
$ sudo dd if=/dev/zero of=/dev/sdb bs=512 count=1 seek=32There is no need to backup this usually empty part of the extended boot record (EBR).
Reinstalling GRUB after FlexNet removal

Remain within the live session. If not done so earlier, mount the boot partition of the affected drive (here
/dev/sdb1).$ sudo mount /dev/sdb1 /mnt
Finally, reinstall GRUB on the affected drive with:
$ sudo grub-install --boot-directory=/mnt /dev/sdbGRUB should now install without any warnings. You are now safe to reboot from the disinfected hard drive. Still, remember to edit the file system table /etc/fstab, though!

This work is licensed under a Creative Commons Attribution‑NonCommercial‑ShareAlike 4.0 International License.
Other licensing available on request.

Unless otherwise stated, all originally authored software on this site is licensed under the terms of GNU GPL version 3.
This static web site has no backend database.
Hence, no personal data is collected and GDPR compliance is met.
Moreover, this domain does not set any first party cookies.
All Google ads shown on this web site are, irrespective of your location,
restricted in data processing to meet compliance with the CCPA and GDPR.
However, Google AdSense may set third party cookies for traffic analysis and
use JavaScript to obtain a unique set of browser data.
Your browser can be configured to block third party cookies.
Furthermore, installing an ad blocker like EFF's Privacy Badger
will block the JavaScript of ads.
Google's ad policies can be found here.
transcoded by


 .
.

