 |
You’re reading Ry’s Git Tutorial |
Remotes
Simply put, a remote repository is one that is not your
own. It can be another Git repository that’s on your company’s
network, the internet, or even your local filesystem, but the point is that
it’s a repository distinct from your my-git-repo
project.
We’ve already seen how branches can streamline a workflow within a single repository, but they also happen to be Git’s mechanism for sharing commits between repositories. Remote branches act just like the local branches that we’ve been using, only they represent a branch in someone else’s repository.
This means that we can adapt our merging and rebasing skills to make Git a fantastic collaboration tool. Over the next few modules, we’ll be exploring various multi-user workflows by pretending to be different developers working on our example website.
For several parts of this module, we’re going to pretend to be Mary, the graphic designer for our website. Mary’s actions are clearly denoted by including her name in the heading of each step.

If you’ve been following along from the previous module, you already have everything you need. Otherwise, download the zipped Git repository from the above link, uncompress it, and you’re good to go.
Clone the Repository (Mary)
First, Mary needs her own copy of the repository to work with. The Distributed Workflows module will discuss network-based remotes, but right now we’re just going to store them on the local filesystem.
cd/path/to/my-git-repocd..gitclonemy-git-repomarys-repocdmarys-repo
The first two lines navigate the command shell to the directory
above my-git-repo. Make sure to change
/path/to/my-git-repo to the actual path to your repository. The
git clone command copies our repository into
marys-repo, which will reside in the same directory as
my-git-repo. Then, we navigate to Mary’s repository so we
can start pretending to be Mary.
Run git log to verify that Mary’s repository is in fact a
copy of our original repository.
Configure The Repository (Mary)
First off, Mary needs to configure her repository so that we know who contributed what to the project.
gitconfiguser.name"Mary"gitconfiguser.emailmary.example@rypress.com
You may recall from the first module that we used a --global
flag to set the configuration for the entire Git installation. But since
Mary’s repository is on the local filesystem, she needs a local
configuration.
Use a text editor to open up the file called config in the
.git folder of Mary’s project (you may need to enable hidden
files to see .git). This is where local configurations are stored,
and we see Mary’s information at the bottom of the file. Note that this
overrides the global configuration that we set in The
Basics.
Start Mary’s Day (Mary)
Today, Mary is going to be working on her bio page, which she should develop in a separate branch:
gitcheckout-bbio-page
Mary can create and check out branches just like we did in our copy of the
project. Her repository is a completely isolated development environment, and
she can do whatever she wants in here without worrying about what’s going
on in my-git-repo. Just as branches are an abstraction for the
working directory, the staged snapshot, and a commit history, a repository is
an abstraction for branches.
Create Mary’s Bio Page (Mary)
Let’s complete Mary’s biography page. In
marys-repo, change about/mary.html to:
<!DOCTYPE html><htmllang="en"><head><title>About Mary</title><linkrel="stylesheet"href="../style.css"/><metacharset="utf-8"/></head><body><h1>About Mary</h1><p>I'm a graphic designer.</p><h2>Interests</h2><ul><li>Oil Painting</li><li>Web Design</li></ul><p><ahref="index.html">Return to about page</a></p></body></html>
Again, we’re developing this in a branch as a best-practice step: our
master branch is only for stable, tested code. Stage and commit
the snapshot, then take a look at the result.
gitcommit-a-m"Add bio page for Mary"gitlog-n1
The Author field in the log output should reflect the local
configurations we made for Mary’s name and email. Remember that the
-n 1 flag limits history output to a single commit.
Publish the Bio Page (Mary)
Now, we can publish the bio page by merging into the master
branch.
gitcheckoutmastergitmergebio-page
Of course, this results in a fast-forward merge. We’ll eventually pull
this update into my-git-repo once we stop pretending to be Mary.
Here’s what Mary’s repository looks like compared to ours:
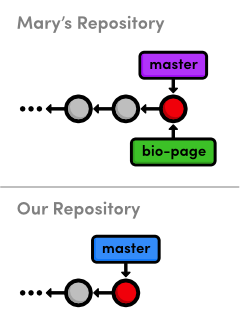
bio-page branch
with her masterNotice that both repositories have normal, local branches—we
haven’t had any interaction between the two repositories, so we
don’t see any remote branches yet. Before we switch back to
my-git-repo, let’s examine Mary’s remote
connections.
View Remote Repositories (Mary)
Mary can list the connections she has to other repositories using the following command.
gitremote
Apparently, she has a remote called origin. When you clone a
repository, Git automatically adds an origin remote pointing to
the original repository, under the assumption that you’ll probably want
to interact with it down the road. We can request a little bit more information
with the -v (verbose) flag:
gitremote-v
This shows the full path to our original repository, verifying that
origin is a remote connection to my-git-repo. The
same path is designated as a “fetch” and a “push”
location. We’ll see what these mean in a moment.
Return to Your Repository (You)
Ok, we’re done being Mary, and we can return to our own repository.
cd../my-git-repo
Notice that Mary’s bio page is still empty. It’s very important
to understand that this repository and Mary’s repository are completely
separate. While she was altering her bio page, we could have been doing all
sorts of other things in my-git-repo. We could have even changed
her bio page, which would result in a merge conflict when we try to pull her
changes in.
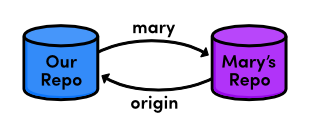
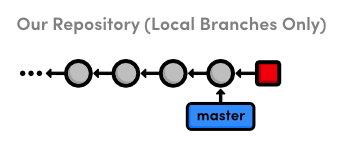
Add Mary as a Remote (You)
Before we can get ahold of Mary’s bio page, we need access to her repository. Let’s look at our current list of remotes:
gitremote
We don’t have any (origin was never created because we
didn’t clone from anywhere). So, let’s add Mary as a remote
repository.
gitremoteaddmary../marys-repogitremote-v
We can now use mary to refer to Mary’s repository, which
is located at ../marys-repo. The git remote add
command is used to bookmark another Git repository for easy access, and our
connections can be seen in the figure below.
Now that our remote repositories are setup, we’ll spend the rest of the module discussing remote branches.
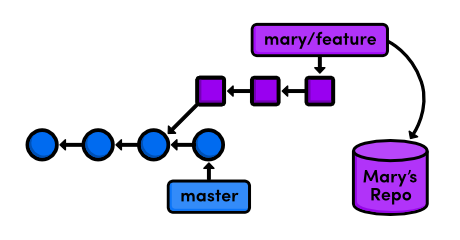
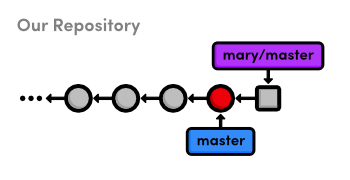
Fetch Mary’s Branches (You)
As noted earlier, we can use remote branches to access snapshots from
another repository. Let’s take a look at our current remote branches with
the -r flag:
gitbranch-r
Again, we don’t have any. To populate our remote branch listing, we need to fetch the branches from Mary’s repository:
gitfetchmarygitbranch-r
This will go to the “fetch” location shown in git remote
-v and download all of the branches it finds there into our repository.
The resulting branches are shown below.
mary/bio-page
mary/master
Remote branches are always listed in the form
<remote‑name>/<branch‑name> so that they
will never be mistaken for local branches. The above listing reflects the state
of Mary’s repository at the time of the fetch, but they will not be
automatically updated if Mary continues developing any of her branches.
That is to say, our remote branches are not direct links into Mary’s repository—they are read-only copies of her branches, stored in our own repository. This means that we would have to do another fetch to access new updates.
The above figure shows the state of our repository. We have access to Mary’s snapshots (represented as squares) and her branches, even though we don’t have a real-time connection to Mary’s repository.
Check Out a Remote Branch
Let’s check out a remote branch to review Mary’s changes.
gitcheckoutmary/master
This puts us in a detached HEAD state, just like we were in
when we checked out a dangling commit. This shouldn’t be that surprising,
considering that our remote branches are copies of Mary’s
branches. Checking out a remote branch takes our HEAD off the tip
of a local branch, illustrated by the following diagram.
master
branchWe can’t continue developing if we’re not on a local branch. To
build on mary/master we either need to merge it into our own local
master or create another branch. We did the latter in Branches, Part I to build on an old commit and in the previous module to revive a
“lost” commit, but right now we’re just looking at what Mary
did, so the detached HEAD state doesn’t really affect
us.
Find Mary’s Changes
We can use the same log-filtering syntax from the previous module to view Mary’s changes.
gitlogmaster..mary/master--stat
This shows us what Mary has added to her master branch, but it’s also a good idea to see if we’ve added any new changes that aren’t in Mary’s repository:
gitlogmary/master..master--stat
This won’t output anything, since we haven’t altered our database since Mary cloned it. In other words, our history hasn’t diverged—we’re just behind by a commit.
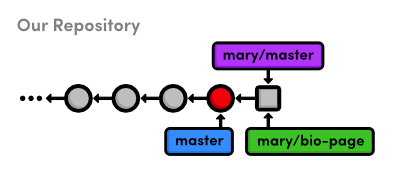
Merge Mary’s Changes
Let’s approve Mary’s changes and integrate them into our own
master branch.
gitcheckoutmastergitmergemary/master
Even though mary/master is a remote branch, this still results
in a fast-forward merge because there is a linear path from our
master to the tip of mary/master:
master
branch into our ownAfter the merge, the snapshots from Mary’s remote branch become a part
of our local master branch. As a result, our master
is now synchronized with Mary’s:
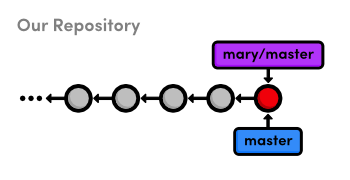
branch into our ownNotice that we only interacted with Mary’s master branch,
even though we had access to her bio-page. If we hadn’t been
pretending to be Mary, we wouldn’t have known what this feature branch
was for or if it was ready to be merged. But, since we’ve designated
master as a stable branch for the project, it was safe to
integrate those updates (assuming Mary was also aware of this convention).
Push a Dummy Branch
To complement our git fetch command, we’ll take a brief
look at pushing. Fetching and pushing are almost
opposites, in that fetching imports branches, while pushing exports branches to
another repository. Let’s take a look:
gitbranchdummygitpushmarydummy
This creates a new branch called dummy and sends it to Mary.
Switch into Mary’s repository to see what we did:
cd../marys-repogitbranch
You should find a new dummy branch in her local branch
listing. I said that git fetch and git push are
almost opposites because pushing creates a new local branch,
while fetching imports commits into remote branches.
Now, put yourself in Mary’s shoes. She was developing in her own
repository when, all of a sudden, a new dummy branch appeared out
of nowhere. Obviously, pushing branches into other people’s repositories
can make for a chaotic workflow. So, as a general rule, you should
never push into another developer’s repository. But then, why
does git push even exist?
Over the next few modules, we’ll see that pushing is a necessary tool for maintaining public repositories. Until then, just remember to never, ever push into one of your friend’s repositories. Let’s get rid of these dummy branches and return to our repository.
gitbranch-ddummycd../my-git-repogitbranch-ddummy
Push a New Tag
An important property of git push is that it does not
automatically push tags associated with a particular branch. Let’s
examine this by creating a new tag.
gittag-av2.0-m"An even stabler version of the website"
We now have a v2.0 tag in my-git-repo, which we
can see by running the git tag command. Now, let’s try
pushing the branch to Mary’s repository.
gitpushmarymaster
Git will say her master branch is already up-to-date, and her
repository will remain unchanged. Instead of pushing the branch that contains
the tag, Git requires us to manually push the tag itself:
gitpushmaryv2.0
You should now be able to see the v2.0 tag in Mary’s
repository with a quick git tag. It’s very easy to forget to
push new tags, so if it seems like your project has lost a tag or two,
it’s most likely because you didn’t to push them to the remote
repository.
Conclusion
In this module, we learned how remote branches can be used to access
content in someone else’s repository. The remotes listed in git
remote are merely bookmarks for a full path to another repository. We
used a local path, but as we’ll soon see, Git can use the SSH protocol to
access repositories on another computer.
The convention of master as a stable branch allowed us to pull
changes without consulting Mary, but this doesn’t necessarily have to be
the case. When implementing your own workflow, Git offers you a lot of
flexibility about when and where you should pull from your team members. As
long as you clearly define your project conventions, you can designate special
uses or privileges to any branch.
That said, it’s important to note that remotes are for
people, whereas branches are for topics. Do not
create separate branches for each of your developers—give them separate
repositories and bookmark them with git remote add. Branches
should always be for project development, not user management.
Now that we know how Git shares information between repositories, we can add some more structure to our multi-user development environment. The next module will show you how to set up and access a shared central repository.
Quick Reference
git clone <remote-path>- Create a copy of a remote Git repository.
git remote- List remote repositories.
git remote add <remote-name> <remote-path>- Add a remote repository.
git fetch <remote-name>- Download remote branch information, but do not merge anything.
git merge <remote-name>/<branch-name>- Merge a remote branch into the checked-out branch.
git branch -r- List remote branches.
git push <remote-name> <branch-name>- Push a local branch to another repository.
git push <remote-name> <tag-name>- Push a tag to another repository.